Integration Testing ensures that the app components work correctly together. These components could be a controller and Entity Framework Core, integration testing will ensure that they work correctly together and produce a desired result. In this tutorial I will perform Integrations Testing in ASP.NET Core app.
The source codes of this tutorial can be downloaded from my GitHub Repository.
Page Contents
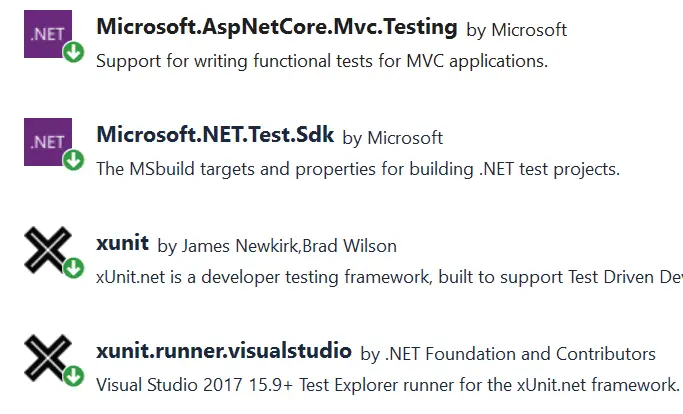
To create the project setup to perform Integration Testing, you should have 2 projects in your solution.
These packages are:
Also added the reference to the ASP.NET Core project in the Class Library project. See the below image which confirms it.
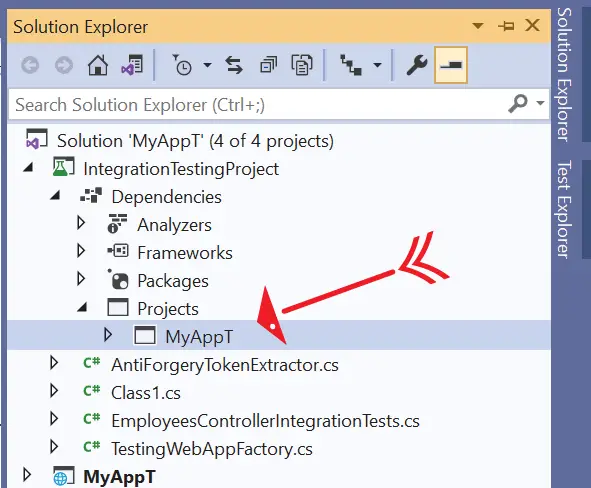
I have named my ASP.NET Core project as MyAppT and named the Class Library project as IntegrationTestingProject.
In my ASP.NET Core Project there is a RegisterController.cs file which performs CRUD operations (Create, Read, Update and Delete operations) to an In-Memory database. Here I will perform the integration testing for the Create, Read, Update & Delete actions. We will write enough test cases so that you can yourself write Integrations Test Cases under any situation.
The CRUD action methods that will be tested are given below.
public async Task<IActionResult> Read()
{
    var rl = await context.ListAsync();
    return View(rl);
}

public IActionResult Create()
{
    return View();
}

[HttpPost]
public async Task<IActionResult> Create(Register register)
{
    if (ModelState.IsValid)
    {
        await context.CreateAsync(register);
        return RedirectToAction("Read");
    }
    else
        return View();
}

public async Task<IActionResult> Update(int id)
{
    Register r = await context.GetByIdAsync(id);
    return View(r);
}

[HttpPost]
public async Task<IActionResult> Update(Register register)
{
    if (ModelState.IsValid)
    {
        await context.UpdateAsync(register);
        ViewBag.Result = "Success";
    }
    return View(register);
}

[HttpPost]
public async Task<IActionResult> Delete(int id)
{
    await context.DeleteAsync(id);
    return RedirectToAction("Read");
}
I will strongly recommend you to have a look to my tutorial called How to use Moq and xUnit for Unit Testing Controllers in ASP.NET Core, to understand the procedure of creating the in-memory database in Entity Framework Core.
If you know how to create in-memory database then simply download the source codes for this tutorial, download link is given at the top.
I will create an In-Memory Test Server against whom the Integration Tests will be performed. Test server is created with the help of WebApplicationFactory<T> class of the Microsoft.AspNetCore.Mvc.Testing package. Here “T” is the entry point which is usually the Program.cs class of the project being tested.
Our project to be tested is MyAppT, so first we need it’s Program.cs class to be available to the testing project. This thing we can do by making the Program class public using a partial class declaration. So add the below line to the end of the “Program.cs” class of MyAppT project.
public partial class Program { }Now add a new class called TestingWebAppFactory.cs in the IntegrationTestingProject. Add the below given code to it.
using Microsoft.AspNetCore.Hosting;
using Microsoft.AspNetCore.Mvc.Testing;
using Microsoft.EntityFrameworkCore;
using Microsoft.Extensions.DependencyInjection;
using MyAppT.Models;

namespace IntegrationTestingProject
{
    public class TestingWebAppFactory<T> : WebApplicationFactory<Program>
    {
        protected override void ConfigureWebHost(IWebHostBuilder builder)
        {
            builder.ConfigureServices(services =>
            {
                var dbContext = services.SingleOrDefault(d => d.ServiceType == typeof(DbContextOptions<AppDbContext>));

                if (dbContext != null)
                    services.Remove(dbContext);

                var serviceProvider = new ServiceCollection().AddEntityFrameworkInMemoryDatabase().BuildServiceProvider();

                services.AddDbContext<AppDbContext>(options =>
                {
                    options.UseInMemoryDatabase("InMemoryEmployeeTest");
                    options.UseInternalServiceProvider(serviceProvider);
                });
                var sp = services.BuildServiceProvider();

                using (var scope = sp.CreateScope())
                {
                    using (var appContext = scope.ServiceProvider.GetRequiredService<AppDbContext>())
                    {
                        try
                        {
                            appContext.Database.EnsureCreated();
                        }
                        catch (Exception ex)
                        {
                            //Log errors
                            throw;
                        }
                    }
                }
            });
        }
    }
}
Let me explain you it’s working.
Our class implements the WebApplicationFactory<Program> class and overrides the ConfigureWebHost method. In this method I removed the AppDbContext and added Entity Framework in-memory database. These things are done by the below code lines.
var dbContext = services.SingleOrDefault(d => d.ServiceType == typeof(DbContextOptions<AppDbContext>));

if (dbContext != null)
    services.Remove(dbContext);

var serviceProvider = new ServiceCollection().AddEntityFrameworkInMemoryDatabase().BuildServiceProvider();
Next, I added the Entity Framework Core in-memory database, as a service, to the IServiceCollection. It will be used for the tests.
services.AddDbContext<AppDbContext>(options =>
{
    options.UseInMemoryDatabase("InMemoryEmployeeTest");
    options.UseInternalServiceProvider(serviceProvider);
});
Next, I created the service provider and the scope of this service. This is done so that the new service (Entity Framework Core in-memory database) can be provided to other classes through Dependency Injection. The below code lines do this work.
var sp = services.BuildServiceProvider();
using (var scope = sp.CreateScope())
{
    using (var appContext = scope.ServiceProvider.GetRequiredService<AppDbContext>())
    {
        try
        {
            appContext.Database.EnsureCreated();
            // call seed database function
        }
        catch (Exception ex)
        {
            //Log errors
            throw;
        }
    }
}
Inside the try method I called the appContext.Database.EnsureCreated() method of EF core which ensures that the database for the context exists. If it exists, no action is taken, if it does not exist then the database and all its schema are created.
If you want to seed the database then call the seed database function after EnsureCreated(). I do not need to seed my database so I have not done the seeding part.
With these preparations, we can start writing our Integration Tests.
Create a new class called RegisterControllerIntegrationTests.cs in the IntegrationTestingProject.
Here implement the TestingWebAppFactory class (which we just created above) with the IClassFixture interface and inject it in a constructor. In the constructor create an instance of the HttpClient. The code of this class is given below.
using Xunit;

namespace IntegrationTestingProject
{
    public class RegisterControllerIntegrationTests : IClassFixture<TestingWebAppFactory<Program>>
    {
        private readonly HttpClient _client;
        public RegisterControllerIntegrationTests(TestingWebAppFactory<Program> factory)
        {
            _client = factory.CreateClient();
        }
    }
}
The IClassFixture interface indicates that tests in this class rely on another class which is our TestingWebAppFactory.cs.
Next, I am going to add integration tests to this class one by one.
Add the test method called Read_GET_Action() whose code is given below.
using Xunit;

namespace IntegrationTestingProject
{
    public class RegisterControllerIntegrationTests : IClassFixture<TestingWebAppFactory<Startup>>
    {
        private readonly HttpClient _client;
        public RegisterControllerIntegrationTests(TestingWebAppFactory<Startup> factory)
        {
            _client = factory.CreateClient();
        }

        [Fact]
        public async Task Read_GET_Action()
        {
            // Act
            var response = await _client.GetAsync("/Register/Read");

            // Assert
            response.EnsureSuccessStatusCode();
            var responseString = await response.Content.ReadAsStringAsync();

            Assert.Equal("text/html; charset=utf-8", response.Content.Headers.ContentType.ToString());
            Assert.Contains("<h1 class=\"bg-info text-white\">Records</h1>", responseString);
        }
    }
}
I called the Read action of the Register controller by making a GET request to it’s URL which is /Register/Read.
var response = await _client.GetAsync("/Register/Read");Next, I tested with the EnsureSuccessStatusCode to check if the call is successful or not. The test will pass if it returns true and will fail if it returns false.
response.EnsureSuccessStatusCode();The HTTP Response which is serialized to a string is stored in “responseString” variable.
var responseString = await response.Content.ReadAsStringAsync();Next, I verified that the HTTP Headers content type is text/html; charset=utf-8. This is done by the below code line.
Assert.Equal("text/html; charset=utf-8", response.Content.Headers.ContentType.ToString());I also verified that the response contains an H1 tag with a text called “Records”.
Assert.Contains("<h1 class=\"bg-info text-white\">Records</h1>", responseString);The above check is done because on opening the URL of the Read action method which is https://localhost:7195/Register/Read, you will find the “Records” heading on the top in h1 tag. I have marked it on the below image.

By checking it, the test method will ensure that the Read action is indeed called.
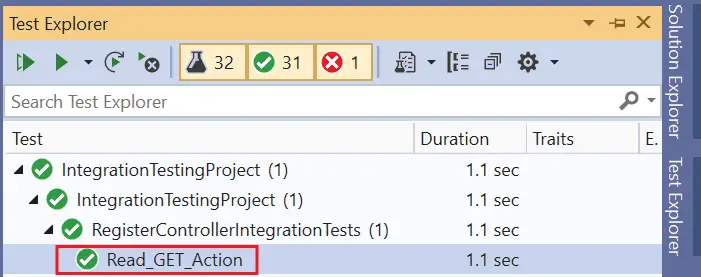
Run this test in the Test explorer and it will get passed. Check below image.
Next, I will test the Create action (HTTP GET) of the RegisterController.cs. So add the test method called Create_GET_Action() whose code is given below.
[Fact]
public async Task Create_GET_Action()
{
    // Act
    var response = await _client.GetAsync("/Register/Create");

    // Assert
    response.EnsureSuccessStatusCode();
    var responseString = await response.Content.ReadAsStringAsync();

    Assert.Contains("Create Record", responseString);
}
I called the URL of this create action by using GetAsync method.
var response = await _client.GetAsync("/Register/Create");Then the tests are done to ensure it is called successfully and checking the response string for the text “Create Record”.
response.EnsureSuccessStatusCode();
var responseString = await response.Content.ReadAsStringAsync();
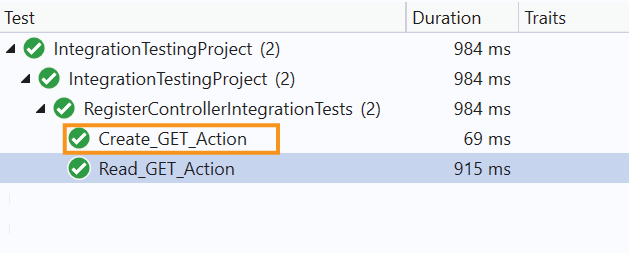
Assert.Contains("Create Record", responseString);These tests were similar to the previous tests. You can run this test method and it will pass.
The HTTP POST type of Create action is called when the user fills the form and submit it. There are 2 cases arising:
So add a new test method called Create_POST_Action_InvalidModel() whose code is given below:
[Fact]
public async Task Create_POST_Action_InvalidModel()
{
    // Arrange
    var postRequest = new HttpRequestMessage(HttpMethod.Post, "/Register/Create");
    var formModel = new Dictionary<string, string>
    {
        { "Name", "New Person" },
        { "Age", "25" }
    };
    postRequest.Content = new FormUrlEncodedContent(formModel);

    // Act
    var response = await _client.SendAsync(postRequest);

    // Assert
    response.EnsureSuccessStatusCode();
    var responseString = await response.Content.ReadAsStringAsync();
    Assert.Contains("The field Age must be between 40 and 60", responseString);
}
Let us understand this test method.
First, I am creating a HTTP Request message where I have specified the URL of this action and the HTTP type to be “Post”.
var postRequest = new HttpRequestMessage(HttpMethod.Post, "/Register/Create");
Then I created form model which is a dictionary type. I add the 2 fields of the Register.cs class to it. The Register.cs class code is given below. You can notice that the validation on the age field is 40 to 60.
public class Register
{
    public int Id { get; set; }

    [Required]
    public string Name { get; set; }

    [Range(40, 60)]
    public int Age { get; set; }
}
As I am providing the age field with a value of 25 therefore this will lead to invalid mode and validation error will come to place when the form is submitted. This is indeed what this integration test is written form.
var formModel = new Dictionary<string, string>
{
    { "Name", "New Person" },
    { "Age", "25" }
};
Next, the Create action is initiated by the below code and model value is provided to it.
var response = await _client.SendAsync(postRequest);Finally, I serialize the response and make assertion verification.
response.EnsureSuccessStatusCode();
var responseString = await response.Content.ReadAsStringAsync();
Assert.Contains("The field Age must be between 40 and 60", responseString);
The thing to note here is that when submitting the form with age value of 25, the validation error received due to the [Range(40, 60)] attribute will be “The field Age must be between 40 and 60”. The check is done to find this text in the response string.
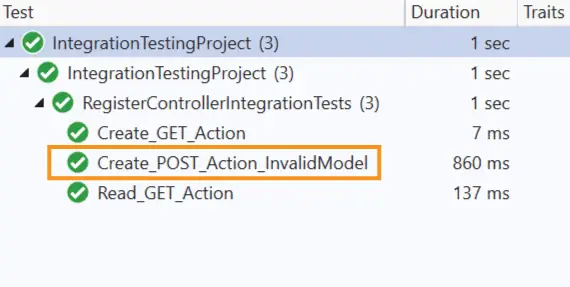
Run the test and it will pass, see below image.
Now I will do the Integration Testing for the Create action (HTTP POST) but this time the model will be valid that is no validation error will come to picture. You guessed it correctly, the age value will be added to an allowed one.
So add the test method called Create_POST_Action_ValidModel() whose code is given below.
[Fact]
public async Task Create_POST_Action_ValidModel()
{
    // Arrange
    var postRequest = new HttpRequestMessage(HttpMethod.Post, "/Register/Create");
    var formModel = new Dictionary<string, string>
    {
        { "Name", "New Person" },
        { "Age", "45" }
    };
    postRequest.Content = new FormUrlEncodedContent(formModel);

    // Act
    var response = await _client.SendAsync(postRequest);

    // Assert
    response.EnsureSuccessStatusCode();
    var responseString = await response.Content.ReadAsStringAsync();
    Assert.Contains("New Person", responseString);
    Assert.Contains("45", responseString);
}
Notice the form model value contains the correct age this time as 45 is between the allowed range of 40 to 60.
var formModel = new Dictionary<string, string>
{
    { "Name", "New Person" },
    { "Age", "45" }
};
So, this time the form will be submitted successfully and the record will be added to the in-memory database. The user will then be redirected to the “Read” action and the newly added record is shown on the browser.
I made the check in the test method to find if the response string contains the newly added value that is “New Person” and “45”.
Assert.Contains("New Person", responseString);
Assert.Contains("45", responseString);
Run this test and it will pass.

The anti-forgery token can be used to help protect your application against cross-site request forgery. So far, no action method has included it. If I include the [ValidateAntiForgeryToken] attribute on the Create action of the Register Controller. Then the test method will fail. Let me show it to you.
Go to the RegisterController.cs and add [ValidateAntiForgeryToken] attribute over the Create action of Post type.
[HttpPost]
[ValidateAntiForgeryToken]
public async Task<IActionResult> Create(Register register)
{
    if (ModelState.IsValid)
    {
        await context.CreateAsync(register);
        return RedirectToAction("Read");
    }
    else
        return View();
}
Now run the tests again and you will notice that both the test for the Create action method (HTTP POST Types) fails this time. I have illustrated this in the below image.

Let us now update the integration tests to include the AntiForgeryToken value so that these test methods can pass.
I will create a new class called AntiForgeryTokenExtractor.cs to the IntegrationTestingProject, it’s work will be to extract the anti-forgery cookie and field. The code of this class is given below.
using Microsoft.Net.Http.Headers;
using System.Text.RegularExpressions;

namespace IntegrationTestingProject
{
    public static class AntiForgeryTokenExtractor
    {
        public static string Field { get; } = "AntiForgeryTokenField";
        public static string Cookie { get; } = "AntiForgeryTokenCookie";

        private static string ExtractCookieValue(HttpResponseMessage response)
        {
            string antiForgeryCookie = response.Headers.GetValues("Set-Cookie").FirstOrDefault(x => x.Contains(Cookie));

            if (antiForgeryCookie is null)
                throw new ArgumentException($"Cookie '{Cookie}' not found in HTTP response", nameof(response));

            string antiForgeryCookieValue = SetCookieHeaderValue.Parse(antiForgeryCookie).Value.ToString();

            return antiForgeryCookieValue;
        }

        private static string ExtractAntiForgeryToken(string htmlBody)
        {
            var requestVerificationTokenMatch = Regex.Match(htmlBody, $@"\<input name=""{Field}"" type=""hidden"" value=""([^""]+)"" \/\>");
            if (requestVerificationTokenMatch.Success)
                return requestVerificationTokenMatch.Groups[1].Captures[0].Value;
            throw new ArgumentException($"Anti forgery token '{Field}' not found", nameof(htmlBody));
        }

        public static async Task<(string field, string cookie)> ExtractAntiForgeryValues(HttpResponseMessage response)
        {
            var cookie = ExtractCookieValue(response);
            var token = ExtractAntiForgeryToken(await response.Content.ReadAsStringAsync());

            return (token, cookie);
        }
    }
}
Let us discuss this class methods one by one.
This method fetches the value of the Set-Cookie property, from the Header of our response. It throws an exception if the cookie is not present.
This method uses regex expression to extract the HTML control from the html Body string, that contains the anti-forgery field value. An exception is thrown if it is not found.
This method collects the results of the above 2 methods and returns them as a Tuple object.
Next move to the TestingWebAppFactory.cs class and inject the token details in IServiceCollection. I have shown this in highlighted manner.
using Microsoft.AspNetCore.Hosting;
using Microsoft.AspNetCore.Mvc.Testing;
using Microsoft.EntityFrameworkCore;
using Microsoft.Extensions.DependencyInjection;
using MyAppT.Models;

namespace IntegrationTestingProject
{
    public class TestingWebAppFactory<T> : WebApplicationFactory<Program>
    {
        protected override void ConfigureWebHost(IWebHostBuilder builder)
        {
            builder.ConfigureServices(services =>
            {
                var dbContext = services.SingleOrDefault(d => d.ServiceType == typeof(DbContextOptions<AppDbContext>));

                if (dbContext != null)
                    services.Remove(dbContext);

                var serviceProvider = new ServiceCollection().AddEntityFrameworkInMemoryDatabase().BuildServiceProvider();

                services.AddDbContext<AppDbContext>(options =>
                {
                    options.UseInMemoryDatabase("InMemoryEmployeeTest");
                    options.UseInternalServiceProvider(serviceProvider);
                });

                //antiforgery
                services.AddAntiforgery(t =>
                {
                    t.Cookie.Name = AntiForgeryTokenExtractor.Cookie;
                    t.FormFieldName = AntiForgeryTokenExtractor.Field;
                });

                var sp = services.BuildServiceProvider();

                using (var scope = sp.CreateScope())
                {
                    using (var appContext = scope.ServiceProvider.GetRequiredService<AppDbContext>())
                    {
                        try
                        {
                            appContext.Database.EnsureCreated();
                        }
                        catch (Exception ex)
                        {
                            //Log errors
                            throw;
                        }
                    }
                }
            });
        }
    }
}
Now I need to modify the 2 integration test method that failed, these were.
Now I will modify the Integration Test, that had failed previously, with an initial HTTP GET request. This GET request will send a response containing the anti-forgery values, I will extract the anti-forgery values from it. For this I will use the function AntiForgeryTokenExtractor.ExtractAntiForgeryValues() I created in the above section. The below 2 code lines do this work for me.
var initialRes = await _client.GetAsync("/Register/Create");
var antiForgeryVal = await AntiForgeryTokenExtractor.ExtractAntiForgeryValues(initialRes);
Next, I will assign the –
The codes for these are:
postRequest.Headers.Add("Cookie", new CookieHeaderValue(AntiForgeryTokenExtractor.Cookie, antiForgeryVal.cookie).ToString());

var formModel = new Dictionary<string, string>
{
    { AntiForgeryTokenExtractor.Field, antiForgeryVal.field },//new
    { "Name", "New Person" },
    { "Age", "25" }
};
With all these let us perform the updation. I have highlighted the necessary changes that needs to be done.
[Fact]
public async Task Create_POST_Action_InvalidModel()
{
    // Arrange
    var initialRes = await _client.GetAsync("/Register/Create");
    var antiForgeryVal = await AntiForgeryTokenExtractor.ExtractAntiForgeryValues(initialRes);

    var postRequest = new HttpRequestMessage(HttpMethod.Post, "/Register/Create");

    postRequest.Headers.Add("Cookie", new CookieHeaderValue(AntiForgeryTokenExtractor.Cookie, antiForgeryVal.cookie).ToString());

    var formModel = new Dictionary<string, string>
    {
        { AntiForgeryTokenExtractor.Field, antiForgeryVal.field },
        { "Name", "New Person" },
        { "Age", "25" }
    };
    postRequest.Content = new FormUrlEncodedContent(formModel);

    // Act
    var response = await _client.SendAsync(postRequest);

    // Assert
    response.EnsureSuccessStatusCode();
    var responseString = await response.Content.ReadAsStringAsync();
    Assert.Contains("The field Age must be between 40 and 60", responseString);
}

[Fact]
public async Task Create_POST_Action_ValidModel()
{
    // Arrange
    var initialRes = await _client.GetAsync("/Register/Create");
    var antiForgeryVal = await AntiForgeryTokenExtractor.ExtractAntiForgeryValues(initialRes);

    var postRequest = new HttpRequestMessage(HttpMethod.Post, "/Register/Create");

    postRequest.Headers.Add("Cookie", new CookieHeaderValue(AntiForgeryTokenExtractor.Cookie, antiForgeryVal.cookie).ToString());

    var formModel = new Dictionary<string, string>
    {
        { AntiForgeryTokenExtractor.Field, antiForgeryVal.field },
        { "Name", "New Person" },
        { "Age", "45" }
    };
    postRequest.Content = new FormUrlEncodedContent(formModel);

    // Act
    var response = await _client.SendAsync(postRequest);

    // Assert
    response.EnsureSuccessStatusCode();
    var responseString = await response.Content.ReadAsStringAsync();
    Assert.Contains("New Person", responseString);
    Assert.Contains("45", responseString);
}
Let us run the test and they will all pass.
It is also interesting to check those cookie and field values in the response by putting a breakpoint on the test case and then selecting Debug from Test Explorer. I have shown this in the below video.
To test Update action we should have some dummy records in the database. We can do this by seeding the database during the time of it’s creation. We do this by adding a “Seed” function to the TestingWebAppFactory.cs class. Check the highlighted code below of this class which shows the Seed() function added to it. It adds 3 dummy records to the database.
using Microsoft.AspNetCore.Hosting;
using Microsoft.AspNetCore.Mvc.Testing;
using Microsoft.EntityFrameworkCore;
using Microsoft.Extensions.DependencyInjection;
using MyAppT.Models;

namespace IntegrationTestingProject
{
    public class TestingWebAppFactory<T> : WebApplicationFactory<Program>
    {
        protected override void ConfigureWebHost(IWebHostBuilder builder)
        {
            builder.ConfigureServices(services =>
            {
                var dbContext = services.SingleOrDefault(d => d.ServiceType == typeof(DbContextOptions<AppDbContext>));

                if (dbContext != null)
                    services.Remove(dbContext);

                var serviceProvider = new ServiceCollection().AddEntityFrameworkInMemoryDatabase().BuildServiceProvider();

                services.AddDbContext<AppDbContext>(options =>
                {
                    options.UseInMemoryDatabase("InMemoryEmployeeTest");
                    options.UseInternalServiceProvider(serviceProvider);
                });

                //antiforgery
                services.AddAntiforgery(t =>
                {
                    t.Cookie.Name = AntiForgeryTokenExtractor.Cookie;
                    t.FormFieldName = AntiForgeryTokenExtractor.Field;
                });

                var sp = services.BuildServiceProvider();

                using (var scope = sp.CreateScope())
                {
                    using (var appContext = scope.ServiceProvider.GetRequiredService<AppDbContext>())
                    {
                        try
                        {
                            appContext.Database.EnsureCreated();
                            Seed(appContext);
                        }
                        catch (Exception ex)
                        {
                            //Log errors
                            throw;
                        }
                    }
                }

            });
        }

        private void Seed(AppDbContext context)
        {
            var one = new Register()
            {
                Name = "Test One",
                Age = 40
            };

            var two = new Register()
            {
                Name = "Test Two",
                Age = 50
            };

            var three = new Register()
            {
                Name = "Test Three",
                Age = 60
            };
            context.AddRange(one, two, three);
            context.SaveChanges();
        }
    }
}
There are 3 Integration Test Cases for the Update feature. One test for GET version and 2 for POST Version. The test are totally similar like that of the Create action method. See the tests given below.
[Fact]
public async Task Update_GET_Action()
{
    // Arrange
    int testId = 1;

    // Act
    var response = await _client.GetAsync($"/Register/Update/{testId}");

    // Assert
    response.EnsureSuccessStatusCode();
    var responseString = await response.Content.ReadAsStringAsync();
    Assert.Contains("1", responseString);
    Assert.Contains("Test One", responseString);
    Assert.Contains("40", responseString);
}

[Fact]
public async Task Update_POST_Action_InvalidModel()
{
    // Arrange
    int testId = 1;

    var initialRes = await _client.GetAsync($"/Register/Update/{testId}");
    var antiForgeryVal = await AntiForgeryTokenExtractor.ExtractAntiForgeryValues(initialRes);

    var postRequest = new HttpRequestMessage(HttpMethod.Post, $"/Register/Update");

    postRequest.Headers.Add("Cookie", new CookieHeaderValue(AntiForgeryTokenExtractor.Cookie, antiForgeryVal.cookie).ToString());

    var formModel = new Dictionary<string, string>
                        {
                            { AntiForgeryTokenExtractor.Field, antiForgeryVal.field },
                            { "Id", $"{testId}" },
                            { "Name", "Test One" },
                            { "Age", "25" }
                        };
    postRequest.Content = new FormUrlEncodedContent(formModel);

    // Act
    var response = await _client.SendAsync(postRequest);

    // Assert
    response.EnsureSuccessStatusCode();
    var responseString = await response.Content.ReadAsStringAsync();
    Assert.Contains("The field Age must be between 40 and 60", responseString);
}

[Fact]
public async Task Update_POST_Action_ValidModel()
{
    // Arrange
    int testId = 2;
    var initialRes = await _client.GetAsync($"/Register/Update/{testId}");
    var antiForgeryVal = await AntiForgeryTokenExtractor.ExtractAntiForgeryValues(initialRes);

    var postRequest = new HttpRequestMessage(HttpMethod.Post, "/Register/Update");

    postRequest.Headers.Add("Cookie", new CookieHeaderValue(AntiForgeryTokenExtractor.Cookie, antiForgeryVal.cookie).ToString());

    var formModel = new Dictionary<string, string>
                        {
                            { AntiForgeryTokenExtractor.Field, antiForgeryVal.field },
                            { "Id", $"{testId}" },
                            { "Name", "New Person" },
                            { "Age", "45" }
                        };
    postRequest.Content = new FormUrlEncodedContent(formModel);

    // Act
    var response = await _client.SendAsync(postRequest);

    // Assert
    response.EnsureSuccessStatusCode();
    var responseString = await response.Content.ReadAsStringAsync();
    Assert.Contains("2", responseString);
    Assert.Contains("New Person", responseString);
    Assert.Contains("45", responseString);
}
The final integration test is for the Delete Action method. This test is given below.
[Fact]
public async Task Delete_POST_Action()
{
    // Arrange
    int testId = 3;
    var postRequest = new HttpRequestMessage(HttpMethod.Post, $"/Register/Delete/{testId}");

    // Act
    var response = await _client.SendAsync(postRequest);

    // Assert
    response.EnsureSuccessStatusCode();
    var responseString = await response.Content.ReadAsStringAsync();
    Assert.DoesNotContain("Test Three", responseString);
    Assert.DoesNotContain("60", responseString);
}
Here we called the Delete action and passed the 3rd record id for deletion. We then confirmed that it is indeed deleted by using the DoesNotContain() method.
Assert.DoesNotContain("Test Three", responseString);
Assert.DoesNotContain("60", responseString);
Run the integration tests for the final time and they will all pass as shown in the below image:

In this tutorial you learned to perform Integration Testing in ASP.NET Core MVC. You also learned how to extract and inject anti forgery token value to integration test methods. I hope you enjoyed learning these things. So, make use of them in your testing job.
SHARE THIS ARTICLE

Hello Everyone,
 Welcome to Hosting.Work - A Programming Tutorial Website. It covers ASP.NET Core topics. I hope you enjoy reading it.
Enter your email address to subscribe to this blog and receive notifications of new posts by email
Subscribe to our Newsletter and recevie "1 email per week" for the article published on the site. No spamming...