Automated UI testing can be performed with Selenium Library. In this tutorial I will perform UI testing of an ASP.NET Core app with Selenium. Selenium supports all the major browsers, for this article I will test only the Chrome browser. This is because writing test for other browsers are exactly similar and you can do that by yourself. The source codes of this tutorial can be downloaded from my GitHub Repository.
Page Contents
To create the project setup to perform UI Testing with Selenium, you should have 2 projects in your solution.
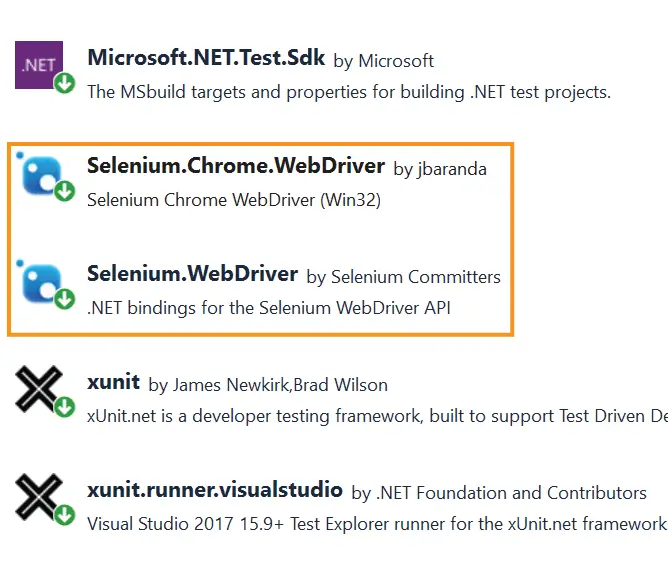
The most important thing is that you will need to install the 2 Selenium packages from NuGet to your testing project. These packages are:
In the below image I marked these 2 Selenium packages.
You will also need to reference the ASP.NET Core project in the Class Library project. I have named my ASP.NET Core project as MyAppT and named the Class Library project as UITestingProject.
The ASP.NET Core Project contains a RegisterController.cs which performs CRUD operations (Create, Read, Update and Delete of records) to an In-Memory database. Here I will perform the UI Testing for the Create action method, it’s code is shown below. The UI testing of Read, Update and Delete actions are exactly same like that of the Create actions and you will be able to do them by yourself.
public IActionResult Create()
{
    return View();
}

[HttpPost]
public async Task<IActionResult> Create(Register register)
{
    if (ModelState.IsValid)
    {
        await context.CreateAsync(register);
        return RedirectToAction("Read");
    }
    else
        return View();
}
I will strongly recommend you to have a look to my tutorial called How to use Moq and xUnit for Unit Testing Controllers in ASP.NET Core to look for the procedure of creating the in-memory database in Entity Framework Core. There I created this “RegisterController.cs” from scratch.
Create a new class called UITest.cs in the UITestingProject class library project. Implement IDisposable interface in the class.
namespace UITestingProject
{
    public class UITest: IDisposable
    {
        public void Dispose()
        {
        }
    }
}
Next, in the constructor of the class, instantiate the IWebDriver object by using the ChromeDriver class and dispose it in the Dispose method.
using OpenQA.Selenium.Chrome;
using OpenQA.Selenium;

namespace UITestingProject
{
    public class UITest: IDisposable
    {
        private readonly IWebDriver driver;
        public UITest()
        {
            driver = new ChromeDriver();
        }
        public void Dispose()
        {
            driver.Quit();
            driver.Dispose();
        }
    }
}
The IWebDriver object provides the user helpful methods /properties to control the browser’s behavious. Some important methods and properties which we will be using here are as follows:
Now let’s move forward and start writing UI tests with Selenium one by one.
The Create action method (of GET type) in the Register Controller returns the “Create” view. In this UI test I am going to check the browser behavior. So add a new test method called Create_GET_ReturnsCreateView to the UITest.cs, it’s code is given below:
[Fact]
public void Create_GET_ReturnsCreateView()
{
    driver.Navigate().GoToUrl("https://localhost:7195/Register/Create");

    Assert.Equal("Create Record - MyAppT", driver.Title);
    Assert.Contains("Create Record", driver.PageSource);
}
In the first line, I told the web browser to navigate to the URL of the Create action method.
driver.Navigate().GoToUrl("https://localhost:7195/Register/Create");Next, I performed 2 tests with xUnit. These are checking the title of the page which should be “Create Record – MyAppT” and checking the page source should contain “Create Record”.
Assert.Equal("Create Record - MyAppT", driver.Title);
Assert.Contains("Create Record", driver.PageSource);
The checking of the “Create Record” text is done because this text is shown in the Create View as a heading in h1 tag. You can open the url – https://localhost:7195/Register/Create and can clearly see this heading.
The server should be in running state for the UI test to be performed. So, start the application without debugging (CTRL+F5). The right click the test name on the Test Explorer and select “Run”.
As soon as you run the test, notice a new browser window gets opened and soon after that it is closed automatically, because I called the Quit method in the Dispose method. A little bit later, the test will pass.
I have shown this in the below video so do check it now.
Now I will check the UI working of the HTTP POST type Create action method. The scenario will be when the model is invalid, to make this happened I will be adding an invalid age of 30 (age should be 40 to 60). So, add a new method called Create_POST_InvalidModel() to the test class, the code for this method is given below.
[Fact]
public void Create_POST_InvalidModel()
{
    driver.Navigate().GoToUrl("https://localhost:7195/Register/Create");

    driver.FindElement(By.Id("Name")).SendKeys("Test");

    driver.FindElement(By.Id("Age")).SendKeys("30");

    driver.FindElement(By.ClassName("btn-primary")).Click();

    var errorMessage = driver.FindElement(By.CssSelector(".validation-summary-errors > ul > li")).Text;

    Assert.Equal("The field Age must be between 40 and 60.", errorMessage);
}
I loaded the URL of the Create action method but this time populated the Name and Id text boxes with values. Notice I added an invalid age of 30 to the age text box.
driver.FindElement(By.Id("Name")).SendKeys("Test");
driver.FindElement(By.Id("Age")).SendKeys("30");
I used the By.Id() method of the OpenQA.Selenium namespace to find an element by it’s id. The name text box has an id of “Name” and the “Age” text box has an Id of “Age”, therefore I provided it to the By.Id() as it’s parameter in order to find these elements.
Next I simulated the click of the button using Click() method of the driver object. I find the button with it’s CSS class in this case – By.ClassName("btn-primary").
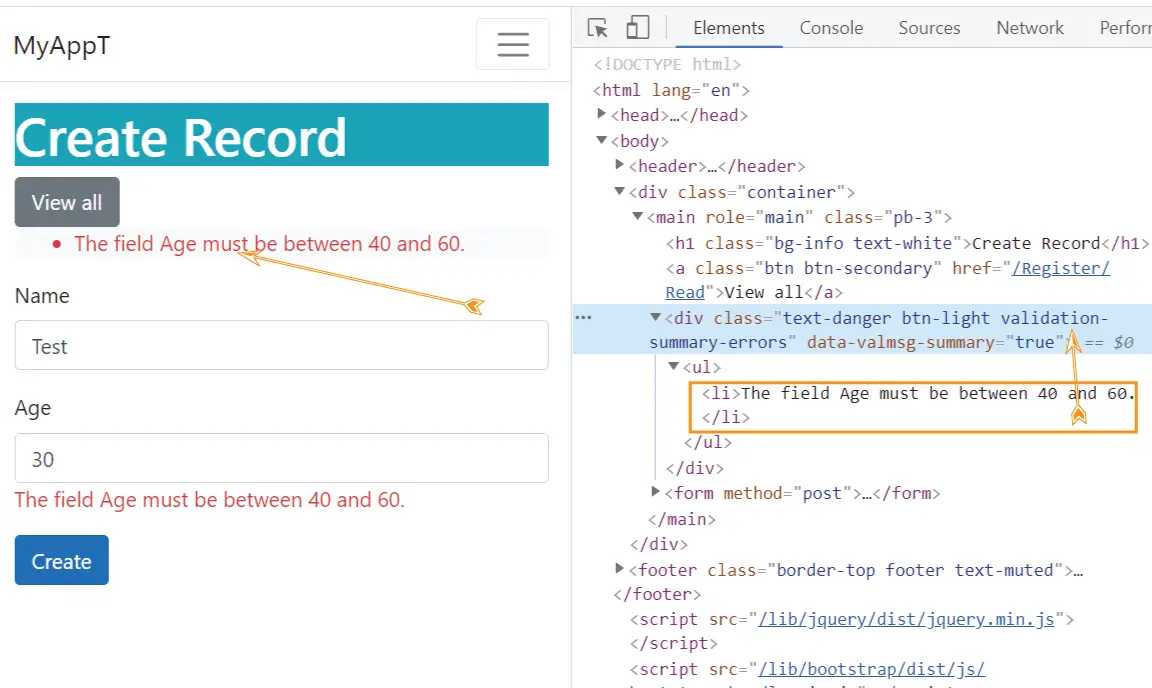
driver.FindElement(By.ClassName("btn-primary")).Click();Since the age is not valid therefore, we will be receiving validation error messages. The error message “The field Age must be between 40 and 60.” is shown inside the validation summary div that has a CSS called “validation-summary-errors” and ul and li elements.
I am finding it by using the By.CssSelector() method and then making the assertion.
var errorMessage = driver.FindElement(By.CssSelector(".validation-summary-errors > ul > li")).Text;
Assert.Equal("The field Age must be between 40 and 60.", errorMessage);
Check the below image where I have marked the validation summary and the ul li element containing the validation error message.
Run the test and it will pass.
The final UI test is testing the browser’s behaviour when the Name and age are proper so the clicking of the button will create the record in the database (in-memory in this case).
The browser will then be redirecting to the “Read” action where the newly added record will be shown. So add the test method called Create_POST_ValidModel() whose code is given below.
[Fact]
public void Create_POST_ValidModel()
{
    driver.Navigate().GoToUrl("https://localhost:7195/Register/Create");

    driver.FindElement(By.Id("Name")).SendKeys("Test");

    driver.FindElement(By.Id("Age")).SendKeys("40");

    driver.FindElement(By.ClassName("btn-primary")).Click();

    Assert.Equal("Records - MyAppT", driver.Title);
    Assert.Contains("Test", driver.PageSource);
    Assert.Contains("40", driver.PageSource);
}
Notice Here I am populating the Name and Age in correct values and clicking the button. This will be adding the record and redirecting the user to the Read action.
In the Read action this newly record is shown.
Next, I am validating the title of the Read action to be “Records – MyAppT” and the name and age getting displayed or not. The codes which do this work are:
Assert.Equal("Records - MyAppT", driver.Title);
Assert.Contains("Test", driver.PageSource);
Assert.Contains("40", driver.PageSource);
All the UI test methods in Selenium are written and tested in xUnit. For the last time run all these tests in the Text Explorer and they will pass.
This concludes Selenium testing tutorial. If this tutorial adds value then please share it on your facebook, twitter and other social accounts.
SHARE THIS ARTICLE

Hello Everyone,
 Welcome to Hosting.Work - A Programming Tutorial Website. It covers ASP.NET Core topics. I hope you enjoy reading it.
Enter your email address to subscribe to this blog and receive notifications of new posts by email
Subscribe to our Newsletter and recevie "1 email per week" for the article published on the site. No spamming...