xUnit is a Free and Open Source testing package for .NET. It can be used to write Unit Testing codes for C# methods, Classes, Controller, API and others. In this tutorial I will teach how to use xUnit in writing Test Cases for an ASP.NET Core application.
The source codes of this tutorial can be downloaded from my GitHub Repository.
Page Contents
In testing terms, a Test Driven Development (TDD) is the approach to write a test before implementing the target code. Here, a test is written that is known to fail, the developer then writes the target code and keeps on updating it so that it passes the test. You should follow TDD approach when creating apps as your codes will be up to 95% bug free in the first place itself.
xUnit use the 3 attributes called [Fact], [Theory] and [InlineData] to create and perform unit tests. These are explained below.
Let us understand the integration procedure of xUnit in an ASP.NET Core application. Then we will understand how to write unit tests in xUnit. So open Visual Studio and create a new ASP.NET Core MVC app.

Name your project as MyAppT.
Then select the latest version of .NET which is 8.0 currently.

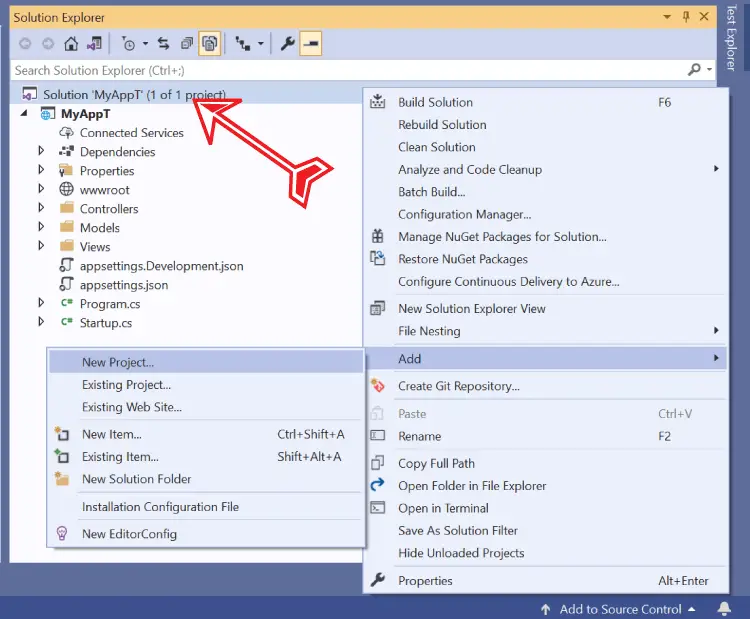
Next, you will need to add a new Class Library project to the solution. In this project the Unit Test cases in xUnit will be written.
So right click the solution name in solution explorer and select Add ➤ New Project. Check below image.
On the next window that appears, select Class Library. See below image.

Give this project name as TestingProject and choose it’s location same as the location of your MyAppT app. On the next screen choose the framework as .NET 8.0 and click the “Create” button.

This new project will be created and both of the projects will start showing in the Solution Explorer. I have shown this in the below given image.
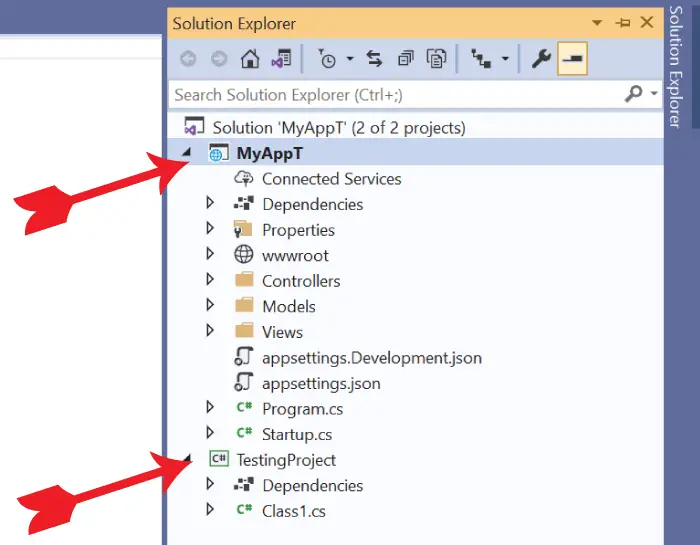
Since we want to test the main project i.e MyAppT, we have to add it’s reference to the TestingProject. So, in the TestingProject, right click the Dependencies link and select Add Project Reference. Then check the checkbox of MyAppT and click OK button.
This will add the project reference. I have shown this procedure in the below video.
Now you will have to add xUnit testing package to your TestingProject. Right click the TestingProject in Solution Explorer window and select Manage NuGet Packages then install the following 3 packages to your TestingProject.
I have shown these 3 packages in the below image:

Congrats, the xUnit package and necessary setup is completed. Now we are ready to start writing test cases in xUnit.
Let us start with a very easy example. Suppose you need to test a C# class functionality. This C# class can do some sort of works like calculating the value of a complex maths function, doing some machine learning task and so on.
For this case let this class predicts the value of Tesla stocks after one year. The user provides the class with the current value of Tesla stock and the class will return it’s predicted value for the next year. To keep the things easy, I would be just be increasing the current Tesla stock value by 50%. So, if the user provides the current value of $800 then the class will return $1200 predicted value.
Let us write this class code in the MyAppT project. Create a new folder called Infrastructure and to it add a new class called TeslaStock.cs. In this class create a new method called Predict() that accepts the current stock value in it’s int type parameter. It increases the value by 50% and then returns this new value. The full code of this class is given below:
namespace MyAppT.Infrastructure
{
    public class TeslaStock
    {
        public int Predict(int currentValue)
        {
            int newValue = Convert.ToInt32(currentValue + (.5 * currentValue));
            return newValue;
        }
    }
}
The Predict function increases the value supplied to it’s parameter by 50%. For doing this it uses a simple maths formula – currentValue + (.5 * currentValue).
Now let us write test case (test method) for performing the testing of this Predict function. So, create a new class called TestTeslaStock.cs in the TestingProject as shown below.
using MyAppT.Infrastructure;
using Xunit;

namespace TestingProject
{
    public class TestTeslaStock
    {
        [Fact]
        public void Test_Predict()
        {
            // Arrange
            TeslaStock TS = new TeslaStock();

            // Act
            int newValue = TS.Predict(800);

            // Assert
            Assert.Equal(1200, newValue);
        }
    }
}
In this class code, notice I have imported the namespace called MyAppT.Infrastructure so that I can play with the TeslaStock which resides in another project. As a reminder, I have already referenced the project that contains TeslaStock class in the TestingProject.
Other than this, I have also imported the xUnit namespace.
using Xunit;The [Fact] attribute is applied to the Test_Predict method which specifies that this method is going to perform testing of some code of the app.
I am calling the Predict method of the TeslaStock class and have passed 800 as the current value of Tesla stock.
TeslaStock TS = new TeslaStock();
int newValue= TS.Predict(800);
It returns the predicted value of the stock which is assigned to the newValue variable.
Finally, I am using the Assert.Equal method of xUnit to verify that the predicted value of the stock (assigned to “newValue”) is equal to 1200 (which is 50% increase of current value of 800).
Assert.Equal(1200, newValue);The Assert.Equal method takes 2 parameters – first is expected values and second is the actual value. Both should be equal if the test has to pass.
Arrange, Act and Assert are called test pattern or test steps. They help developers to write good tests. No matter what testing package you are using makes sure you follow this pattern always.
Arrange – here you setup the inputs and targets. You can see that I have initialized the TeslaStock class in this step.
TeslaStock TS = new TeslaStock();Act – in this step you call the targeted function that needs to be tested. You can see that I have called the Predict() method in this step.
int newValue = TS.Predict(800); Assert – in this step you will ultimately determine if the test passes or fails. You can see that I have used the Assert.Equal method to check whether the test has passed or not.
Assert.Equal(1200, newValue);Now it’s time to run this test method to makes sure whether it works or not. For that purpose, we are going to use the Visual Studio’s Test Explorer, which can be opened from the View ➤ Test Explorer menu in VS.

The Test Explorer shows all the tests in the project and group them into the test that have run successfully (shown in Green Color), which have failed (shown in Red Color) or which have not run till now (shown in Blue Color). There are also options to run all the tests, run those tests that have failed and so on. Initially, since no tests are run, therefore they are shown in blue color. You will also find your test method Test_Predict listed there in blue color. See the below image where I have shown this.

Now select Run All Tests in View option in the Test Explorer, which will run the “Test_Predict” test method. The “Test_Predict” will soon be passed and will now be shown in green color. Check the below video where I am selecting the select Run All Tests in View option in the Test Explorer.

Congratulations, your first test case has been passed.
Let us now fail this test and see how Test Explorer will react. So, change 1200 to 1000 in the Assert.Equal method. Run the test once more and the test will fail this time. The Test Explorer will show the test method in Red Color with a cross sign. I have shown this in the below image.
Assert.Equal(1000, newValue);
The [Theory] denotes a test method that is true for a subset of data. The subset of data is provided to the test method through an [InlineData] attribute. What about predicting the tesla stock value for not one but multiple values? This can be done by the help of [Theory] and [InlineData] attributes.
So, add a new test method called Test_PredictMultiple to the TestTeslaStock.cs class. It’s code is given below:
using MyAppT.Infrastructure;
using Xunit;

namespace TestingProject
{
    public class TestTeslaStock
    {
        [Fact]
        public void Test_Predict()
        {
            // Arrange
            TeslaStock TS = new TeslaStock();

            // Act
            int newValue = TS.Predict(800);

            // Assert
            Assert.Equal(1200, newValue);
        }

        [Theory]
        [InlineData(200)]
        [InlineData(400)]
        [InlineData(800)]
        public void Test_PredictMultiple(int currentValue)
        {
            // Arrange
            TeslaStock TS = new TeslaStock();

            // Act
            int newValue = TS.Predict(currentValue);
            int calculate = Convert.ToInt32(currentValue + (.5 * currentValue));

            // Assert
            Assert.Equal(currentValue + (.5 * currentValue), newValue);
        }
    }
}
This time I have provided this test method with 3 values by using “InlineData” attribute. The value supplied by the InlineData attribute is received in the parameter of the test method. I calculate the predicted value and store it in a variable called Calculate.
Finally, I am using the Assert.Equal method to perform the testing. Note that here the test will run 3 times as there are 3 subsets of data.
Now select the Run All Tests in View option in the Test Explorer. You will see the Test_PredictMultiple method is run for 3 times. I have shown this in the below image:

The Assert class contains various static methods that are used to verify that the conditions are met during the process of running tests. Some important methods are.
| Name | Description |
|---|---|
| Equal | Verifies that two values are equal. There are various overloads that accepts int, string, DateTime, and other types of values. |
| Null | Verifies that an object is null. |
| True | Verifies that a condition is true. |
| False | Verifies that a condition is false. |
| IsType | Verifies that an object is of a given type. |
| IsAssignableFrom | Verifies that an object is of the given type or a derived type. |
We will be using these methods in our test cases during the course of this tutorial.
Now it’s time to test a ASP.NET Core MVC Controller with xUnit. This controller accepts a party invitation, and has action methods that allow user to add his/her name for the upcoming party. Add a new controller called PartyController.cs to the Controllers folder of “MyAppT” project. Add the below code to it:
using Microsoft.AspNetCore.Mvc;

namespace MyAppT.Controllers
{
    public class PartyController : Controller
    {
        public IActionResult Entry()
        {
            return View();
        }

        [HttpPost]
        public IActionResult Entry(string name, string membership)
        {
            if (string.IsNullOrEmpty(name))
                ModelState.AddModelError("name", "Please enter your name");
            if (string.IsNullOrEmpty(membership))
                ModelState.AddModelError("membership", "Please enter your membership");

            if (ModelState.IsValid)
            {
                string nm = name + "," + membership;
                return View((object)nm);
            }
            else
                return BadRequest(ModelState);
        }
    }
}
The user enters his/her name along with membership (like Silver, Gold, Platinum) on the form and submits it.
On submitting the form, the user’s name and membership is stored. Then the time of the party is shown to the user. Note that I am also doing validations to force the user to enter his/her name and membership before submitting the form. The below code does this validation part.
if (string.IsNullOrEmpty(name))
    ModelState.AddModelError("name", "Please enter your name");
if (string.IsNullOrEmpty(membership))
    ModelState.AddModelError("membership", "Please enter your membership");
For any empty fields, I am adding the validation error to the ModelState like:
ModelState.AddModelError("name", "Please enter your name");Next, I am checking for the valid ModelState, and if it is valid then returning the “name” and “membership” to the view in an object form.
if (ModelState.IsValid)
{
    string nm = name + "," + membership;
    return View((object)nm);
}
When the ModelState is invalid (it happens when use does not enter both his name and membership on the form) then I am creating Microsoft.AspNetCore.Mvc.BadRequestObjectResult for the response which produces Microsoft.AspNetCore.Http.StatusCodes.Status400BadRequest. The below code does this work.
return BadRequest(ModelState);Next, create Entry.cshtml razor view file inside the Views ➤ Party folder of the MyAppT project. It’s code is given below:
@model string

@{
    ViewData["Title"] = "Add Party Entry";
}

<h1 class="bg-info text-white">Add Party Entry</h1>
<div asp-validation-summary="All" class="text-danger btn-light"></div>

<form class="m-1 p-1" method="post">
    <div class="form-group">
        <label>Name</label>
        <input name="Name" type="text" class="form-control" />
    </div>
    <div class="form-group">
        <label>Membership</label>
        <input name="Membership" type="text" class="form-control" />
    </div>
    <button type="submit" class="btn btn-primary">Submit</button>
</form>

@{
    if (Model != null)
    {
        <h2 class="bg-danger text-white">Welcome to the Party</h2>
        <h2 class="bg-info text-white">Tomorrow at 9:00 PM</h2>
        <table class="table table-sm table-bordered">
            <tr>
                <th>Name</th>
                <th>Membership</th>
            </tr>

            <tr>
                <td>@Model.ToString().Split(',')[0]</td>
                <td>@Model.ToString().Split(',')[1]</td>
            </tr>
        </table>
    }
}
This view presents a form for entering the name and membership for the party.
<form class="m-1 p-1" method="post">
    <div class="form-group">
        <label>Name</label>
        <input name="Name" type="text" class="form-control" />
    </div>
    <div class="form-group">
        <label>Membership</label>
        <input name="Membership" type="text" class="form-control" />
    </div>
    <button type="submit" class="btn btn-primary">Submit</button>
</form>
The same view also shows the welcome message along with the party timings when the form is submitted successfully.
@{
    if (Model != null)
    {
        <h2 class="bg-danger text-white">Welcome to the Party</h2>
        <h2 class="bg-info text-white">Tomorrow at 9:00 PM</h2>
        <table class="table table-sm table-bordered">
            <tr>
                <th>Name</th>
                <th>Membership</th>
            </tr>

            <tr>
                <td>@Model.ToString().Split(',')[0]</td>
                <td>@Model.ToString().Split(',')[1]</td>
            </tr>
        </table>
    }
}
Well, that’s all, now run and see how this controller works. I have shown the working in the below video.
I will write test cases for the Party Controller. I will be writing 3 test methods for the controller. These methods are named as:
Create a new class called TestParty.cs to the TestingProject. In this class the above 3 test methods will be added.
Inside this TestParty.cs class add a new Test method called Test_Entry_GET_ReturnsViewResultNullModel whose code is given below. I have shown it’s code below and also highlighted it with a different color.
using Xunit;
using Microsoft.AspNetCore.Mvc;
using MyAppT.Controllers;

namespace TestingProject
{
    public class TestParty
    {
        [Fact]
        public void Test_Entry_GET_ReturnsViewResultNullModel()
        {
            // Arrange
            var controller = new PartyController();

            // Act
            var result = controller.Entry();

            // Assert
            var viewResult = Assert.IsType<ViewResult>(result);
            Assert.Null(viewResult.ViewData.Model);
        }
    }
}
Recall the “Entry” action of HTTP GET type returns IActionResult type with a null model.
public IActionResult Entry()
{
    return View();
}
Therefore, in the test method I used Assert.IsType to verify that the return type of the action method is of ViewResult.
var viewResult = Assert.IsType<ViewResult>(result);You may say why ViewResult instead of IActionResult ? The reason is that IActionResult is an interface and ViewResult is a class that implements IActionResult interface. You can only check a class type with IsType() method and so this is the reason why I have used ViewResult here.
Next, I have checked that the action method returns a null model. This checking is done by Assert.Null method of xUnit.
Assert.Null(viewResult.ViewData.Model);Next add the test method called Test_Entry_POST_InvalidModelState whose full code is shown below:
using Xunit;
using Microsoft.AspNetCore.Mvc;
using MyAppT.Controllers;

namespace TestingProject
{
    public class TestParty
    {
        //…

        [Fact]
        public void Test_Entry_POST_InvalidModelState()
        {
            // Arrange
            var controller = new PartyController();

            // Act
            var result = controller.Entry(null, null);

            // Assert
            var badRequestResult = Assert.IsType<BadRequestObjectResult>(result);
            Assert.IsType<SerializableError>(badRequestResult.Value);
        }
    }
}
When user submits the form without filling his name and membership then he/she get’s the bad request, and in this test method I am testing this case only.
I called the Entry action by providing null values for the name and membership parameters.
var result = controller.Entry(null, null);Then checking if the action result is of BadRequestObjectResult.
var badRequestResult = Assert.IsType<BadRequestObjectResult>(result);I also tested for SerializableError for the value returned.
Assert.IsType<SerializableError>(badRequestResult.Value);Next add the test method called Test_Entry_POST_ValidModelState whose full code is shown below:
using Xunit;
using Microsoft.AspNetCore.Mvc;
using MyAppT.Controllers;

namespace TestingProject
{
    public class TestParty
    {
        //...

        [Fact]
        public void Test_Entry_POST_ValidModelState()
        {
            // Arrange
            string name = "Tom Cruise", membership = "Platinum";
            var controller = new PartyController();

            // Act
            var result = controller.Entry(name, membership);

            // Assert
            var viewResult = Assert.IsType<ViewResult>(result);
            var model = Assert.IsAssignableFrom<string>(viewResult.ViewData.Model);
        }
    }
}
When the user fill both his/her name and membership on the form and submits it. Then user returns to the view with the name and membership (which is the model value) in string type.
if (ModelState.IsValid)
{
    string nm = name + "," + membership;
    return View((object)nm);
}
In this test method, I perform testing to make sure the returned value from the action is ViewResult.
var viewResult = Assert.IsType<ViewResult>(result);Also checking if the model value is of string type.
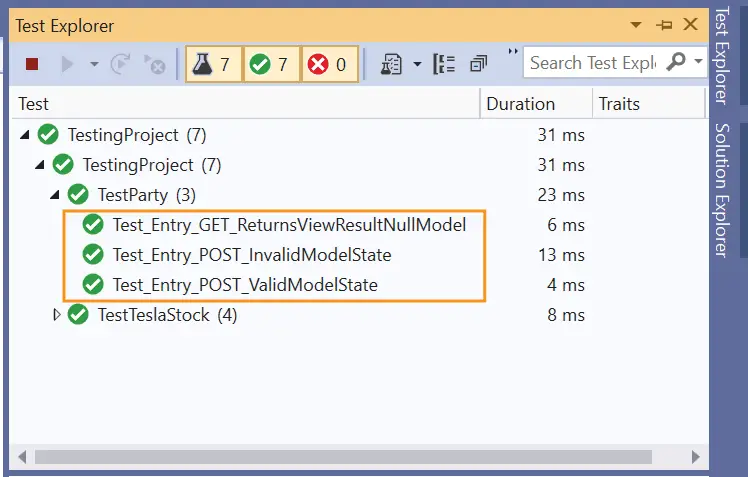
var model = Assert.IsAssignableFrom<string>(viewResult.ViewData.Model);Now run all the test you will see all these 3 tests passes successfully. I have shown them in the below image.
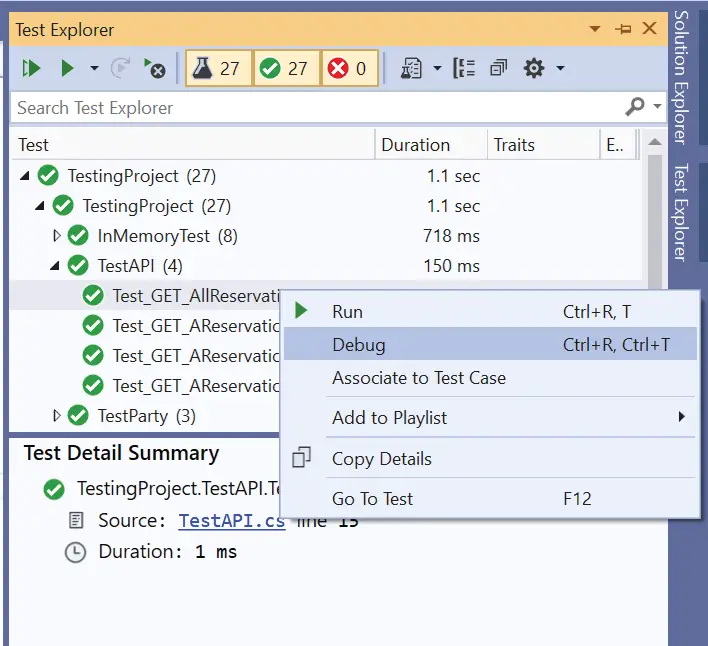
If you want to Debug any test method then right click the name of the test in the Test Explorer and select Debug. It is useful if you want to put a breakpoint on any test method and then select Debug option. See the below image which shown how to select the Debug option.
Once breakpoint is hit on the test method then move line by line ahead by pressing F10 key and check the values of the code lines.
Check the below video where I am debugging a test method by putting a breakpoint and selecting the Debug option.
In this tutorial I have explained and created tests methods to perform testing for the class methods and also for Controllers of ASP.NET Core app. I hope you enjoyed learning them. Please share it on facebook and twitter.
SHARE THIS ARTICLE

Hello Everyone,
 Welcome to Hosting.Work - A Programming Tutorial Website. It covers ASP.NET Core topics. I hope you enjoy reading it.
Enter your email address to subscribe to this blog and receive notifications of new posts by email
Subscribe to our Newsletter and recevie "1 email per week" for the article published on the site. No spamming...