In this tutorial we will understand how Asynchronous Communication between Microservices work. In our Pizza Drone Delivery application we have 2 Microservices – CommandCenter and ProcessCenter. They communicate with one another synchronously using HttpClient class. We will change this communication to Asynchronous one by using RabbitMQ which is an open-source message broker.
Page Contents
You can find this tutorial’s the complete Source Code at my GitHub Repository.
RabbitMQ is an open-source and most popular message broker service which you can use for performing asynchronous communication between microservices. RabbitMQ ensures that the messages are never lost and get delivered to the respective consumer.
In simple words, one microservice publishes messages to RabbitMQ. So this microservice is called as a Publisher. RabbitMQ stores these messages on it’s local storage and delivers them to second microservice which is called as Consumer. After the messages are delivered RabbitMQ deletes them from it’s own storage.
Messages can be anything like a simple string or a class object.
RabbitMQ provides:
1. Better Scalability – RabbitMQ helps to scale up microservices quite easy. More and more microservices can be added to the application and they can all communicate with one another with the help of RabbitMQ.
2. Messages are never lost – even if the consumer microservice is down, RabbitMQ will store the messages and will deliver them when the microservice is up again.

The easiest way to install RabbitMQ is through Docker.

So create a new file called docker-compose.yaml file as shown below:
version: "3.8"

services:
  rabbitmq:
    image: rabbitmq:management
    container_name: rabbitmq
    ports:
      - 5672:5672
      - 15672:15672
    volumes:
      - rabbitmqdata:/var/lib/rabbitmq
    hostname: rabbitmq
volumes:
  mongodbdata:
  rabbitmqdata:
You will find this file in the source code folder. In this yaml file:
1. Two images rabbitmq and management are specified and these will run from a docker container named “rabbitmq”.
2. Ports of the container 5672 and 15672 are exposed to the host. The port 15672 will open rabbitmq management portal on the browser while the port 5672 will be used by the microservices to communicate with rabbitmq.
3. We made the use of docker volume for the rabbitmq container. This will prevent data loss in case the container crashes.
Now, in the command prompt window, navigate to the folder of this file and run the following command:
docker-compose up -dThis command will execute the yaml file code and soon RabbitMQ will start running from a docker container in your pc.

Now in your browse open the url of the RabbitMQ management portal, this url is http://localhost:15672/. For the username and password enter “guest” and click the Login button.

This will take you inside the portal where you can see exchanges, queues for the messages. We will come to this portal later on when we will integrate RabbitMQ in the microservices.
If you don’t want to use docker for rabbitmq then you can install it through packages manager like Chocolatey. See the Installation of RabbitMQ link.
I strongly advise you to prefer docker approach since microservices knowledge is incomplete without the usage of docker.
Let us now integrate RabbitMQ to our first Microservice which is CommandCenter. This microservice will be set as Publisher so it will publish messages to RabbitMQ. Then RabbitMQ will deliver those messages asynchronously to ProcessCenter microservice.
First of all, add MassTransit.RabbitMQ NuGet packages to the “CommandCenter” ASP.NET Core application:

Now open appsettings.json file and add section for “RabbitMQSettings” as shown below:
{
  "Logging": {
    "LogLevel": {
      "Default": "Information",
      "Microsoft": "Warning",
      "Microsoft.Hosting.Lifetime": "Information"
    }
  },
  "ServiceSettings": {
    "ServiceName": "Order"
  },
  "MongoDbSettings": {
    "Host": "localhost",
    "Port": "27017"
  },
  "RabbitMQSettings": {
    "Host": "localhost"
  },
  "AllowedHosts": "*"
}
Next, open the Setting folder and add a new class called RabbitMQSettings.cs to it. It’s code is given below:
namespace CommandCenter.Setting
{
    public class RabbitMQSettings
    {
        public string Host { get; init; }
    }
}
Now we create Message object of type Record. They will take the messages to RabbitMQ. So inside the Infrastructure folder create a new class called Contracts.cs which creates 3 message objects – OrderCreated, OrderUpdated and OrderDeleted. The code of Contracts.cs is given below:
namespace Infrastructure
{
    public record OrderCreated(Guid Id, string Address, int Quantity, DateTimeOffset CreatedDate);
    public record OrderUpdated(Guid Id, string Address, int Quantity, DateTimeOffset CreatedDate);
    public record OrderDeleted(Guid Id);
}Now in the Program.cs class configure MassTransit for the microservice to work as a publisher of messages. I have shown this in highlighted code below:
using CommandCenter.Entity;
using CommandCenter.MongoDB;
using CommandCenter.Setting;
using MassTransit;
using System.Reflection;

var builder = WebApplication.CreateBuilder(args);

// Add services to the container.
var serviceSettings = builder.Configuration.GetSection(nameof(ServiceSettings)).Get<ServiceSettings>();
builder.Services.AddMassTransit(x =>
{
    x.AddConsumers(Assembly.GetEntryAssembly());
    x.UsingRabbitMq((context, configurator) =>
    {
        var rabbitMqSettings = builder.Configuration.GetSection(nameof(RabbitMQSettings)).Get<RabbitMQSettings>();
        configurator.Host(rabbitMqSettings.Host);
        configurator.ConfigureEndpoints(context, new KebabCaseEndpointNameFormatter(serviceSettings.ServiceName, false));
    });
});

builder.Services.AddMongo().AddMongoRepository<Order>("pizzaItems");
builder.Services.AddControllers(options =>
{
    options.SuppressAsyncSuffixInActionNames = false;
});

// Learn more about configuring Swagger/OpenAPI at https://aka.ms/aspnetcore/swashbuckle
builder.Services.AddEndpointsApiExplorer();
builder.Services.AddSwaggerGen();

var app = builder.Build();

// Configure the HTTP request pipeline.
if (app.Environment.IsDevelopment())
{
    app.UseSwagger();
    app.UseSwaggerUI();
}

app.UseHttpsRedirection();

app.UseAuthorization();

app.MapControllers();

app.Run();
Points to note:
MassTransit is a dot net abstraction layer to work on RabbitMQ. It makes easier to work with RabbitMQ by providing lots of friendly methods. In our context, we are using MassTransit to publish / receive messages from our RabbitMQ server.
Now coming to OrderController.cs where I will be publishing messages for 3 cases:
I have shown all the new updated code in highlighted way below:
using CommandCenter.Entity;
using CommandCenter.Infrastructure;
using Infrastructure;
using MassTransit;
using Microsoft.AspNetCore.Mvc;

namespace CommandCenter.Controllers
{
    [ApiController]
    [Route("order")]
    public class OrderController : ControllerBase
    {
        private readonly IRepository<Order> repository;
        public readonly IPublishEndpoint publishEndpoint;

        public OrderController(IRepository<Order> repository, IPublishEndpoint publishEndpoint)
        {
            this.repository = repository;
            this.publishEndpoint = publishEndpoint;
        }

        [HttpGet]
        public async Task<ActionResult<IEnumerable<OrderDto>>> GetAsync()
        {
            var items = (await repository.GetAllAsync()).Select(a => a.AsDto());
            return Ok(items);
        }

        [HttpGet("{id}")]
        public async Task<ActionResult<OrderDto>> GetByIdAsync(Guid id)
        {
            var item = await repository.GetAsync(id);
            if (item == null)
            {
                NotFound();
            }
            return item.AsDto();
        }

        [HttpPost]
        public async Task<ActionResult<OrderDto>> PostAsync(CreateOrderDto createOrderDto)
        {
            var order = new Order
            {
                Address = createOrderDto.Address,
                Quantity = createOrderDto.Quantity,
                CreatedDate = DateTimeOffset.UtcNow,
            };
            await repository.CreateAsync(order);
            await publishEndpoint.Publish(new OrderCreated(order.Id, order.Address, order.Quantity, order.CreatedDate));
            return CreatedAtAction(nameof(GetByIdAsync), new { id = order.Id }, order);
        }

        [HttpPut("{id}")]
        public async Task<IActionResult> PutAsync(Guid id, UpdateOrderDto updateItemDto)
        {
            var existingOrder = await repository.GetAsync(id);
            if (existingOrder == null)
            {
                return NotFound();
            }
            existingOrder.Address = updateItemDto.Address;
            existingOrder.Quantity = updateItemDto.Quantity;
            await repository.UpdateAsync(existingOrder);
            await publishEndpoint.Publish(new OrderUpdated(existingOrder.Id, existingOrder.Address, existingOrder.Quantity, existingOrder.CreatedDate));
            return NoContent();
        }

        [HttpDelete("{id}")]
        public async Task<IActionResult> DeleteAsync(Guid id)
        {
            var item = await repository.GetAsync(id);
            if (item == null)
            {
                return NotFound();
            }
            await repository.RemoveAsync(item.Id);
            await publishEndpoint.Publish(new OrderDeleted(id));
            return NoContent();
        }
    }
}
Points to note:
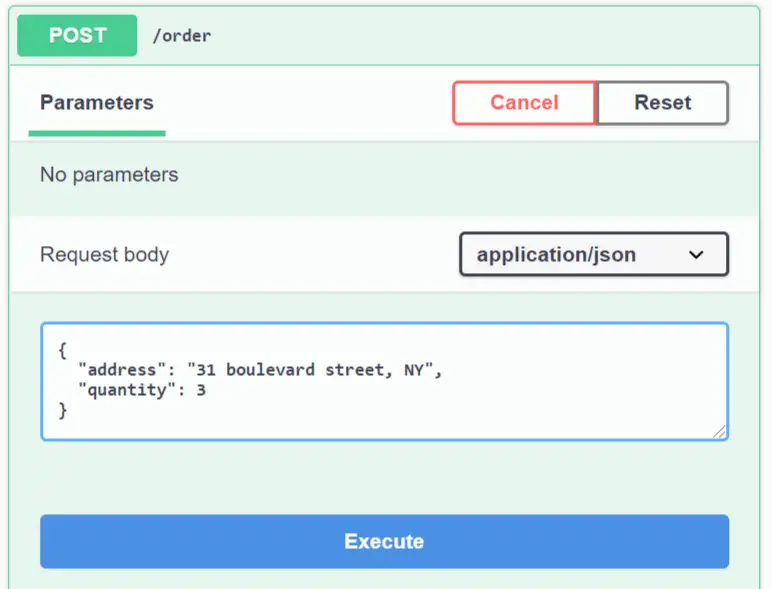
await publishEndpoint.Publish(new OrderCreated(order.Id, order.Address, order.Quantity, order.CreatedDate));await publishEndpoint.Publish(new OrderUpdated(existingOrder.Id, existingOrder.Address, existingOrder.Quantity, existingOrder.CreatedDate));await publishEndpoint.Publish(new OrderDeleted(id));Now let’s test how the messages are Published to RabbitMQ by the CommandCenter Microservice. Make sure MongoDB Docker container is running, (check this link if you are unsure). Run the CommandCenter microservice application in Visual Studio. Next open the swagger page and click the POST button. On the Request body enter the order json:
{
  "address": "31 boulevard street, NY",
  "quantity": 3
}
And click the execute button which will create the record on the mongodb database.
Note : If you prefer Postman for Swagger then feel free to use it.
Now go to the RabbitMQ portal whose url is http://localhost:15672/. Enter “guest” for both username and password for login.
There, open the Exchanges tab and you will notice RabbitMQ has created a new Exchange called Infrastructure:OrderCreated for us that stores the messages. See the below image:

Click on this newly created exchange and you can see it’s details. Notice it show no bindings as there are no consumer for this message.

In the same way you can update the Order and delete them and you will notice more Exchanges are created every time a message is published to RabbitMQ.
Next, we are going to set the Consumer for these exchanges i.e. messages.
We will not create the ProcessCenter microservice as a Consumer for messages in RabbitMQ. So install the same MassTransit.RabbitMQ NuGet Packages on the ProcessCenter application also.
Next, on the appsettings.json file add the RabbitMQSettings section:
{
  "Logging": {
    "LogLevel": {
      "Default": "Information",
      "Microsoft": "Warning",
      "Microsoft.Hosting.Lifetime": "Information"
    }
  },
  "ServiceSettings": {
    "ServiceName": "Process"
  },
  "MongoDbSettings": {
    "Host": "localhost",
    "Port": "27017"
  },
  "RabbitMQSettings": {
    "Host": "localhost"
  },
  "AllowedHosts": "*"
}
Next, inside the “Setting” folder create RabbitMQSettings.cs class with the following code:
namespace ProcessCenter.Setting
{
    public class RabbitMQSettings
    {
        public string Host { get; init; }
    }
}
Next, inside the Infrastructure folder create Contracts.cs file. It is the same file which we also created on the CommandCenter microservice to. The Contracts.cs code is given below:
namespace Infrastructure
{
    public record OrderCreated(Guid Id, string Address, int Quantity, DateTimeOffset CreatedDate);
    public record OrderUpdated(Guid Id, string Address, int Quantity, DateTimeOffset CreatedDate);
    public record OrderDeleted(Guid Id);
}Next, on the Program.cs file’s configure RabbitMQ and MassTransit like before:
using Polly.Timeout;
using Polly;
using ProcessCenter.Client;
using ProcessCenter.Entity;
using ProcessCenter.MongoDB;
using MassTransit;
using System.Reflection;
using ProcessCenter.Setting;

var builder = WebApplication.CreateBuilder(args);

// Add services to the container.
builder.Services.AddMassTransit(x =>
{
    x.AddConsumers(Assembly.GetEntryAssembly());
    x.UsingRabbitMq((context, configurator) =>
    {
        var configuration = context.GetService<IConfiguration>();
        var serviceSettings = configuration.GetSection(nameof(ServiceSettings)).Get<ServiceSettings>();
        var rabbitMqSettings = configuration.GetSection(nameof(RabbitMQSettings)).Get<RabbitMQSettings>();
        configurator.Host(rabbitMqSettings.Host);
        configurator.ConfigureEndpoints(context, new KebabCaseEndpointNameFormatter(serviceSettings.ServiceName, false));
        configurator.UseMessageRetry(b =>
        {
            b.Interval(3, TimeSpan.FromSeconds(5));
        });
    });
});

builder.Services.AddMongo().AddMongoRepository<Process>("processItems");

builder.Services.AddHttpClient<OrderClient>(a =>
{
    a.BaseAddress = new Uri("https://localhost:44393");
})
.AddTransientHttpErrorPolicy(b => b.Or<TimeoutRejectedException>().WaitAndRetryAsync(
    5,
    c => TimeSpan.FromSeconds(Math.Pow(2, c))
))
.AddTransientHttpErrorPolicy(b => b.Or<TimeoutRejectedException>().CircuitBreakerAsync(
    3,
    TimeSpan.FromSeconds(15)
))
.AddPolicyHandler(Policy.TimeoutAsync<HttpResponseMessage>(1));

builder.Services.AddControllers();

var app = builder.Build();

// Configure the HTTP request pipeline.

app.UseHttpsRedirection();

app.UseAuthorization();

app.MapControllers();

app.Run();
Next, on the root of the ProcessCenter app, create a new folder called “Consumers” and to it add a new class called OrderCreatedConsumer.cs whose code is given below:
using MassTransit;
using Infrastructure;

namespace ProcessCenter.Consumers
{
    public class OrderCreatedConsumer : IConsumer<OrderCreated>
    {
        public async Task Consume(ConsumeContext<OrderCreated> context)
        {

        }
    }
}
This class inherits from IConsumer<OrderCreated> so it will act as a consumer of OrderCreated. This means this call will get message whenever an order is created on the CommandCenter microservice.
Let us test it by putting a breakpoint on the “Consume” method. Now run both the CommandCenter and ProcessCenter microservices on the VS. Next create a new order in swagger.

As soon as you create the Order, the breakpoint is hit on the ProcessCenter microservice. On checking the value of the message, they are the same which you used when creating the order. See the below image:

Next, on the RabbitMQ portal go to the Queues tab and see the new queue called “process-order-created” is created.

Once the message is delivered the queue is made empty.
If the consumer microservice is offine, then RabbitMQ will keep the messages on it’s memory. When the microservice comes online say after 1 hour time, then RabbitMQ will deliver the messages to the consumer and empty them from it’s memory.
Thus, RabbitMQ is of a great help to perform Asynchronous communication between Microservices.
We have our Message Producers and Consumers set up so it makes sense to store the messages in MongoDB database. This is because RabbitMQ will keep the messages in the memory only till they are delivered.
So, in our ProcessCenter microservice the message which are consumed will be stored in MongoDB. In the “Entity” folder create Order.cs class whose code is given below.
namespace ProcessCenter.Entity
{
    public class Order : IEntity
    {
        public Guid Id { get; set; }
        public string Address { get; set; }
        public int Quantity { get; set; }
        public DateTimeOffset CreatedDate { get; set; }
    }
}
Next configure MongoDB on the Program.cs class by adding .AddMongoRepository
builder.Services.AddMongo().AddMongoRepository<Process>("processItems").AddMongoRepository<Order>("pizzaItems"); Here I have added “pizzaItems” collection in the AddMongoRepository method.
Next, change OrderCreatedConsumer.cs class code so that when it receives the message from RabbitMQ then they are inserted to MongoDB database. The code of this class is given below:
using Infrastructure;
using MassTransit;
using ProcessCenter.Entity;

namespace ProcessCenter.Consumers
{
    public class OrderCreatedConsumer : IConsumer<OrderCreated>
    {
        private readonly IRepository<Order> repository;
        public OrderCreatedConsumer(IRepository<Order> repository)
        {
            this.repository = repository;
        }

        public async Task Consume(ConsumeContext<OrderCreated> context)
        {
            var message = context.Message;
            var item = await repository.GetAsync(message.Id);
            if (item != null)
            {
                return;
            }

            item = new Order
            {
                Id = message.Id,
                Address = message.Address,
                Quantity = message.Quantity
            };

            await repository.CreateAsync(item);
        }
    }
}
In the “Consumers” folder create another class called OrderUpdatedConsumer.cs which will consume the updated order message. It’s code is given below:
using Infrastructure;
using MassTransit;
using ProcessCenter.Entity;

namespace ProcessCenter.Consumers
{
    public class OrderUpdatedConsumer : IConsumer<OrderUpdated>
    {
        private readonly IRepository<Order> repository;
        public OrderUpdatedConsumer(IRepository<Order> repository)
        {
            this.repository = repository;
        }

        public async Task Consume(ConsumeContext<OrderUpdated> context)
        {
            var message = context.Message;
            var item = await repository.GetAsync(message.Id);
            if (item == null)
            {
                item = new Order
                {
                    Id = message.Id,
                    Address = message.Address,
                    Quantity = message.Quantity
                };
                await repository.CreateAsync(item);
            }
            else
            {
                item.Address = message.Address;
                item.Quantity = message.Quantity;

                await repository.UpdateAsync(item);
            }
        }
    }
}
This class updated the entry in the MongoDB pizzaItems collection.
Next, inside the “Consumers” folder create another class called OrderDeletedConsumer.cs which will consume the deleted order message. It’s code is given below:
using Infrastructure;
using MassTransit;
using ProcessCenter.Entity;

namespace ProcessCenter.Consumers
{
    public class OrderDeletedConsumer : IConsumer<OrderDeleted>
    {
        private readonly IRepository<Order> repository;
        public OrderDeletedConsumer(IRepository<Order> repository)
        {
            this.repository = repository;
        }

        public async Task Consume(ConsumeContext<OrderDeleted> context)
        {
            var message = context.Message;
            var item = await repository.GetAsync(message.Id);
            if (item == null)
            {
                return;
            }
            await repository.RemoveAsync(message.Id);
        }
    }
}
Finally, in the ProcessController.cs, changes needs to be made to the GetAsync(Guid droneId) method so that it fetches the Process record from PizzaItems and ProcessItems collection. The necessary codes is highlighted below:
using Microsoft.AspNetCore.Mvc;
using ProcessCenter.Entity;
using ProcessCenter.Infrastructure;
using static ProcessCenter.Infrastructure.Dtos;

namespace ProcessCenter.Controllers
{
    [ApiController]
    [Route("process")]
    public class ProcessController : ControllerBase
    {
        private readonly IRepository<Process> repository;
        private readonly IRepository<Order> orderRepository;
        public ProcessController(IRepository<Process> repository, IRepository<Order> orderRepository)
        {
            this.repository = repository;
            this.orderRepository = orderRepository;
        }

        [HttpGet]
        public async Task<ActionResult<IEnumerable<ProcessDto>>> GetAsync(Guid droneId)
        {
            if (droneId == Guid.Empty)
            {
                return BadRequest();
            }

            var processEntities = await repository.GetAllAsync(a => a.DroneId == droneId);
            var itemIds = processEntities.Select(a => a.OrderId);
            var orderEntities = await orderRepository.GetAllAsync(a => itemIds.Contains(a.Id));

            var processDtos = processEntities.Select(a =>
            {
                var orderItem = orderEntities.Single(b => b.Id == a.OrderId);
                return a.AsDto(orderItem.Address, orderItem.Quantity);
            });

            return Ok(processDtos);
        }

        [HttpPost]
        public async Task<ActionResult> PostAsync(GrantOrderDto grantOrderDto)
        {
            var process = await repository.GetAsync(a => a.DroneId == grantOrderDto.DroneId && a.OrderId == grantOrderDto.OrderId);
            if (process == null)
            {
                process = new Process
                {
                    DroneId = grantOrderDto.DroneId,
                    OrderId = grantOrderDto.OrderId,
                    Status = grantOrderDto.Status,
                    AcquiredDate = DateTimeOffset.UtcNow
                };

                await repository.CreateAsync(process);
            }
            else
            {
                process.Status = grantOrderDto.Status;
                await repository.UpdateAsync(process);
            }
            return Ok();
        }
    }
}
Let us test the working of these Microservices one last time. First drop both the “Order” and “Process” MongoDB databases. Use MongoDB Compass to do so. Now run the CommandCenter Microservice and create an order with Swagger. The order json is given below.
{
  "address": "Prince Philip Palace, Boston",
  "quantity": 5
}
Just click the POST button on swagger and put this json on the Request body json. Then click the Execute button to create this order.

Now open MongDB Compass and note down the Order Id of the created record, we are going to use it next.

Now stop the CommandCenter microservice and run the ProcessCenter microservice. On the swagger page of ProcessCenter microservice click the POST button to add a Process record. You change the order id on this json with your order id and change status to Processing.
{
  "droneId": "3fa85f64-5717-4562-b3fc-2c963f66afa6",
  "orderId": "9f56eab3-72d6-436d-bc71-eee514f924ea",
  "status": "Processing"
}
Click the Execute and this will create a process record.

You can now check the MongoDB to find a new collection called PizzaItems is created inside the Process database. This collection will store the Messages send by RabbitMQ.

Now on the swagger page of ProcessCenter microservice, click the GET button and enter the drone id (3fa85f64-5717-4562-b3fc-2c963f66afa6) for the record we created before. Click the Execute button.

You will see the full order details.

This means if the CommandCenter microservice is down then also the ProcessCenter Microservice will have all the orders. This was not the case earlier when we created synchronous communication between microserivices using HTTPClient Class.
Check the rabbitmq portal to find more exchanges and queues created for different message types send by the producer.


RabbitMQ is successfully transferring messages from “CommandCenter” microservice to “ProcessCenter” micoservice.
In this tutorial we covered how to do Asynchronous communications between Microservices using RabbitMQ and MassTransit. We also updated our drone pizza delivery microservices to have producers and consumers of messages. I hope you enjoyed learning it. If you have any comments then use the comments section below.
SHARE THIS ARTICLE

Hello Everyone,
 Welcome to Hosting.Work - A Programming Tutorial Website. It covers ASP.NET Core topics. I hope you enjoy reading it.
Enter your email address to subscribe to this blog and receive notifications of new posts by email
Subscribe to our Newsletter and recevie "1 email per week" for the article published on the site. No spamming...