
Repository Pattern is one of the most popular patterns to create apps. It removed duplicate database operation codes and De-couples the application from the Data Access Layer. This gives added advantages to developers when they are creating the apps.
In this tutorial we well be creating CRUD Operations in ASP.NET Core Razor Pages using Repository Pattern.
The app which we will build will be in ASP.NET Core Razor Pages and there will be Entity Framework Core “ORM” on the data access layer.
Download the complete source code from my GitHub Repository.
Page Contents
Repository Pattern is a design pattern where we have a layer that separates the Domain Layer with the Data Access Layer. Domain will call the Repository on every database related work like Create, Read, Update and Delete operations. The Repository will then communicate with the Data Access Layer to perform the operation and return the result back to the domain layer.
See the below image which explains the architecture:

Note that Repository is made with an Interface and a Class which will inherit the interface. In the later section I will be creating this interface and class and explain you the low level working of each of them.
When there is no Repository Pattern then the database operation is performed straight from the Razor Page. See the below code where the Razor Page OnPostAsync method is using the database context class of Entity Framework Core and inserting a record on the database.
public void OnPostAsync(Movie movie)
{
    context.Add(movie);
    await context.SaveChangesAsync();
}
We can now use the Repository Pattern to change the above code as shown below. This time it calls the repository object’s CreateAsync method and then the repository will perform the creation of the record on the database.
public void OnPostAsync(Movie movie)
{
    repository.CreateAsync(movie);
}
Repository Pattern offers many benefits which are given below:
An app will read data from database at multiple places, this will lead to redundant codes. With repository in place, you can simply call the repository which will provide you with the data. Got the point?

Suppose after sometime you need to change the ORM from Entity Framework Core to Dapper. Repository Pattern will help you to achieve this quickly with minimum changes. You will only need to make changes to the Repository according to Dapper without doing any change to the business, domain, UI, Controller, Razor Page, etc.

Let us now implement Repository Pattern, so create a new project in Visual Studio and select the ASP.NET Core Web App (Razor Pages) template as shown by the below image.

Give your app the name MovieCrud.

Next, select .NET 8.0 for framework and click Create button.

Withing a few second the Razor Pages app will be created and then you can add new features to it. I will start with installing Entity Framework Core to the app because it will be used as a database access layer to create CRUD features.
Entity Framework Core is the ORM which we will use to communicate with the database and perform CRUD operations. Our Repository will be taking to Entity Framework Core so that these database operations can be performed. So, we will have to install following 3 packages from NuGet –
These packages can be installed from Manage NuGet Packages for Solution window which can be opened from Tools ➤ NuGet Package Manager ➤ Manage NuGet Packages for Solution.

Next, we will need to create the Entity which will be a Movie.cs class. You have to create this class inside the Models folder. So first create “Models” folder on the root of the app and then inside it create the Movie.cs class.

The code of the Movie.cs class is given below:
using System.ComponentModel.DataAnnotations;

namespace MovieCrud.Models
{
    public class Movie
    {
        public int Id { get; set; }

        [Required]
        public string Name { get; set; }

        [Required]
        public string Actors { get; set; }
    }
}
Points to note:
Database context is a primary class which will interact with the database. We will need to create it inside the Models folder. So, create MovieContext .cs class to the Models folder with the following code:
using Microsoft.EntityFrameworkCore;

namespace MovieCrud.Models
{
    public class MovieContext : DbContext
    {
        public MovieContext(DbContextOptions<MovieContext> options) : base(options)
        {
        }

        public DbSet<Movie> Movie { get; set; }
    }
}
The MovieContext inherits the DbContext class of Microsoft.EntityFrameworkCore namespace. It has the object DbContextOptions<MovieContext> defined on it’s constructor as a dependency. ASP.NET Core dependency injection will provide this object to it.
I have also defined all the entities where EF Core work as DbSet on this class. Since we only have the Movie entity so it is defined as DbSet<Movie>.
Next, we need to register the MovieContext on the Program.cs. So add the following highlighted line which will register our database context.
using Microsoft.EntityFrameworkCore;
using MovieCrud.Models;

var builder = WebApplication.CreateBuilder(args);

// Add services to the container.
builder.Services.AddDbContext<MovieContext>(options =>
        options.UseSqlServer(builder.Configuration.GetConnectionString("DefaultConnection")));
builder.Services.AddRazorPages();

var app = builder.Build();

// Configure the HTTP request pipeline.
if (!app.Environment.IsDevelopment())
{
    app.UseExceptionHandler("/Error");
    // The default HSTS value is 30 days. You may want to change this for production scenarios, see https://aka.ms/aspnetcore-hsts.
    app.UseHsts();
}

app.UseHttpsRedirection();
app.UseStaticFiles();

app.UseRouting();

app.UseAuthorization();

app.MapRazorPages();

app.Run();
We are now ready to perform Entity Framework Core migrations but before that we need to define the database connection string inside the appsettings.json file as shown below:
{
  "ConnectionStrings": {
    "DefaultConnection": "Server=(localdb)\\mssqllocaldb;Database=MovieDb;Trusted_Connection=True;MultipleActiveResultSets=true"
  }
}
I am using mssqllocaldb and the database name as “MovieDb”.
So let us perform the migrations. Go to Tools ➤ NuGet Package Manager ➤ Package Manager Console, and enter the following commands one by one.
add-migration Migration1
Update-DatabaseAfter the Migration commands finish executing you will find a Migrations folder created on the app. This folder contains newly created files that were used to create the database.

Next, go to View ➤ SQL Server Object Explorer where you will find the MovieDb database. This database is created when we ran the migrations. This database will contain only one table called Movie which corresponds to the Movie entity we created in our ASP.NET Core Razor Pages app.

Right click on the Movie table and select View Code. This will show you the tables definition.
CREATE TABLE [dbo].[Movie] (
    [Id]     INT            IDENTITY (1, 1) NOT NULL,
    [Name]   NVARCHAR (MAX) NOT NULL,
    [Actors] NVARCHAR (MAX) NOT NULL,
    CONSTRAINT [PK_Movie] PRIMARY KEY CLUSTERED ([Id] ASC)
);
As discussed earlier all columns are NOT NULL type and the Id column is defined as IDENTITY (1, 1).
Repository Pattern needs 2 things:

The interface will contain all the methods that will be dealing with database operations like CRUD. Commonly you will have methods for Creating, Reading, Updating & Deleting the records on the database. Sometimes we will have a few more methods for dealing with filtering of records. We will see them in the latter sections.
Anyway for now create a new folder called Entity on the root of the app. Then inside it, add a new class called IRepository.cs, this class will define an Interface which we just talked about. So add the following code to this class.
namespace MovieCrud.Entity
{
    public interface IRepository<T> where T : class
    {
        Task CreateAsync(T entity);
    }
}
Things to note:
Next, we create a new class called Repository.cs inside the same “Entity” folder. This class will implement the interface we defined earlier. So add the below given code to the class.
using MovieCrud.Models;

namespace MovieCrud.Entity
{
    public class Repository<T> : IRepository<T> where T : class
    {
        private MovieContext context;

        public Repository(MovieContext context)
        {
            this.context = context;
        }

        public async Task CreateAsync(T entity)
        {
            if (entity == null)
                throw new ArgumentNullException(nameof(entity));

            context.Add(entity);
            await context.SaveChangesAsync();
        }
    }
}
Points to note:
Point 1 – The constructor of the class receives the “MovieContext” object, which is the database context of EF core, in it’s parameter. The ASP.NET Core dependency injection engine will provide this object to the class.
public Repository(MovieContext context)
{
    this.context = context;
}
Point 2 – The CreateAsync method is doing the insertion of the record to the database. It gets the entity of type “T” in it’s parameter and inserts this entity to the database using Entity Framework Core.
Point 3 – The “T” type gives us a great benefit because we it helps to extend the generic repository as we can insert any entity to the database not just the “Movie”. We can simply add more entities like “Employee”, “School”, “Teacher” and the same repository Repository.cs will perform the insertion of that entity without needing any code addition to the Repository. This is the power of Generics.

So, in short, we define a new entity called employee in an Employee.cs class. This employee entity can then be added to the database by the same Repository.cs. Got the point ?
public class Employee
{
    public int Id { get; set; }

    [Required]
    public string Name { get; set; }

    [Required]
    public int Salary { get; set; }

    [Required]
    public string Address { get; set; }
}
Point 4 – The code context.Add(entity) keeps the track of this new entity. Then the code context.SaveChangesAsync() creates the record of this entity in the database. The entity has a default value of 0 for the Id. Entity Framework Core knows that since Id value is 0 therefore it has to create a new record on the database. Had the id value not 0 but in some positive integer value, then EF core would perform updation of the record for this Id value.
Finally, we need to register the Interface to it’s implementation in the Program.cs. The code that has to be added is shown below.
builder.Services.AddTransient(typeof(IRepository<>), typeof(Repository<>));The above code tells ASP.NET Core to provide a new instance of Repository whenever a dependency of IRepository is present. The typeof specfies that the type can be anything like Movie, Teacher, Employee, etc.
Great, we just completed building our Generic Repository Pattern. All we are left is creating the CRUD Operations in Razor Pages.
You now have a very good understanding of the Repository Pattern so we can quickly go through the CRUD Operations.
The first CRUD operation is the Create Record operation. We already have added the CreateAsync method to the IRepository<T> interface:
Task CreateAsync(T entity);We have also added it’s implementation to the Repository.cs class:
public async Task CreateAsync(T entity)
 {
     if (entity == null)
         throw new ArgumentNullException(nameof(entity));

     context.Add(entity);
     await context.SaveChangesAsync();
 }
There is Pages folder on the app’s root folder. You need to create a new Razor Page inside this Pages folder and call it Create.cshtml.
So, right click the Pages folder and select Add ➤ New Item.

Next, on the Add New Item window, select Razor Page – Empty template and name it as Create.cshtml.

The razor page will be created and opened in Visual Studio. Delete it’s initial code and add the following code to it.
@page
@model CreateModel
@using Microsoft.AspNetCore.Mvc.RazorPages;
@using MovieCrud.Entity;
@using Models;

@{
    ViewData["Title"] = "Create a Movie";
}

<h1 class="bg-info text-white">Create a Movie</h1>

<div asp-validation-summary="All" class="text-danger"></div>
<form method="post">
    <div class="form-group">
        <label asp-for="@Model.movie.Name"></label>
        <input type="text" asp-for="@Model.movie.Name" class="form-control" />
        <span asp-validation-for="@Model.movie.Name" class="text-danger"></span>
    </div>
    <div class="form-group">
        <label asp-for="@Model.movie.Actors"></label>
        <input type="text" asp-for="@Model.movie.Actors" class="form-control" />
        <span asp-validation-for="@Model.movie.Actors" class="text-danger"></span>
    </div>
    <button type="submit" class="btn btn-primary">Create</button>
</form>

@functions {
    public class CreateModel : PageModel
    {
        private readonly IRepository<Movie> repository;
        public CreateModel(IRepository<Movie> repository)
        {
            this.repository = repository;
        }

        [BindProperty]
        public Movie movie { get; set; }

        public IActionResult OnGet()
        {
            return Page();
        }

        public async Task<IActionResult> OnPostAsync()
        {
            if (ModelState.IsValid)
                await repository.CreateAsync(movie);
            return Page();
        }
    }
}
Understanding the code: – The page has both razor and C# codes. The top part contains razor code while C# codes are placed inside the functions body. The @page applied on the top specify that this is a Razor Page and can handle http requests.
Now run Visual Studio and open this page on the browser by it’s name, i.e. the url of this page will be – https://localhost:44329/Create. The localhost port will be different for you.

I would also like you to check the _ViewStart.cshtml located inside the “Pages” folder. It contains code that is executed at the start of each Razor Page’s execution. Double click this file and see that it specifies the layout to be _Layout for the razor pages.
@{
    Layout = "_Layout";
}
You will find the layout of the razor pages called_Layout.cshtml inside the Pages ➤ Shared folder. Open this file to find html and razor codes that will form the header and footer of the website.
An important thing to note is the @RenderBody() code. It renders all the content of the Razor Pages. So this means the Create.cshtml Razor Page will be rendered by @RenderBody(), it will have header on the top and footer on the bottom. The header and footer are defined on the layout.

Next, there is a model defined for the Create.cshtml Razor Page and it is named “CreateModel”.
@model CreateModelOn the functions block, the class by the same model is defined. The class inherits the PageModel abstract class.
@functions {
    public class CreateModel : PageModel
    {
    …
    }
}
The constructor of the CreateModel class has a dependency for IRepository<Movie>.
private readonly IRepository<Movie> repository;
public CreateModel(IRepository<Movie> repository)
{
    this.repository = repository;
}
The dependency injection feature solves this by providing the Repository<Movie> object to the constructor. Recall we earlier registered this dependency in the program class:
services.AddTransient(typeof(IRepository<>), typeof(Repository<>));Next see Movie type property defined and it has [BindProperty] attribute. This means this property will get the value from the html elements defined on the form, when the form is submitted. This type of binding is done automatically by ASP.NET Core through Model Binding feature.
[BindProperty]
public Movie movie { get; set; }
We defined 2 input type text elements on the form which are binding with the “Name” and “Actors” properties of the Movie type object.
<form method="post">
    <div class="form-group">
        <label asp-for="@Model.movie.Name"></label>
        <input type="text" asp-for="@Model.movie.Name" class="form-control" />
        <span asp-validation-for="@Model.movie.Name" class="text-danger"></span>
    </div>
    <div class="form-group">
        <label asp-for="@Model.movie.Actors"></label>
        <input type="text" asp-for="@Model.movie.Actors" class="form-control" />
        <span asp-validation-for="@Model.movie.Actors" class="text-danger"></span>
    </div>
    <button type="submit" class="btn btn-primary">Create</button>
</form>
The model binding of the input elements is done by the asp-for tag helper:
<input type="text" asp-for="@Model.movie.Name" class="form-control" />
<input type="text" asp-for="@Model.movie.Actors" class="form-control" />
Tag helpers enables the server-side code to create and render HTML elements. The asp-for tag helper adds 4 html attributes to the input elements. You can see these attributes by “Inspecting” them on the browser. Right click on the browser and select Inspect.

A new window which will show you the html source of the page. Now click on the left most icon which enables you to select an element on the page. I have shown this on the below image.
![]()
Then move your mouse over the name input element, this will highlight it in dark background color. Click it so that it gets selected. Check below image.
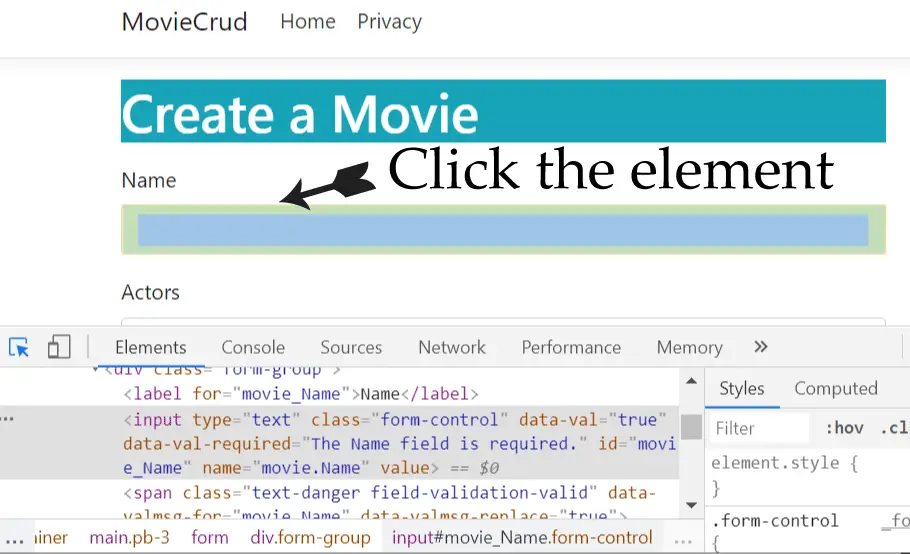
Now the below window will show the html code of the name input element in highlighted color. See the below image where I have marked it.

The html codes of both the Name and Actors input elements are given below.
<input type="text" class="form-control input-validation-error" data-val="true" data-val-required="The Name field is required." id="movie_Name" name="movie.Name" value="">

<input type="text" class="form-control" data-val="true" data-val-required="The Actors field is required." id="movie_Actors" name="movie.Actors" value="">
The 4 added attributes which you can clearly see are:
data-val="true"
data-val-required="The Name/Actors field is required."
id="movie_Name" or id="movie_Actors"
name="movie.Name" or name="movie.Actors"
The name attribute is provided with the value of movie.Name. It helps to bind the value with the object’s property with Model Binding. The id field is also binded similarly except that there is ‘_’ in place of ‘.’, the id attribute is used in Client Side Validation which is done with jQuery Validation and jQuery Unobtrusive Validation. I will not be covering client side validation in this tutorial.
The _ViewImports.cshtml inside the “Pages” folder is used to make directives available to Razor pages globally so that you don’t have to add them to Razor pages individually. If you open it then you will find that the Tag Helpers are also imported there with the following code.
@addTagHelper *, Microsoft.AspNetCore.Mvc.TagHelpersThe data-val and data-val-required creates the model validation features. Let us understand them in details.
The data-val with true value flags the field as being subject to validation and the data-val-required contains the error message to display if the user doesn’t provide the field’s value. This error message is the same what we gave to the Name and Actors fields of the Movie class.
[Required]
public string Name { get; set; }

[Required]
public string Actors { get; set; }
<span asp-validation-for="@Model.movie.Name" class="text-danger"></span>
<span asp-validation-for="@Model.movie.Actors" class="text-danger"></span>
Notice also the asp-validation-for tag helper applied on the 2 span element to display the validation errors for the Name and Actors fields. So, when validation fails, the 2 span will display the values of the data-val-required attributes of the input elements. This is the way Validation works in ASP.NET Core Razor Pages.
I have also added a div before the form on the razor page. This div will show all the validation errors together. This is done by adding the tag helper asp-validation-summary="All" to the div.
<div asp-validation-summary="All" class="text-danger"></div>The razor pages have Handler methods that are automatically executed as a result of a http request. There are 2 hander methods – OnGet and OnPostAsync. The “OnGet” will be called when http type get request is made to the Create Razor Page while the “OnPostAsync”, which is async version of OnPost, is called when http type post request is made to the Create Razor Page.
public IActionResult OnGet()
{
    return Page();
}

public async Task<IActionResult> OnPostAsync()
{
    if (ModelState.IsValid)
        await repository.CreateAsync(movie);
    return Page();
}
The OnGet() handler simply renders back the razor page. The OnPostAsync() handler checks if model state is valid.
if (ModelState.IsValid)It then calls the repository’s CreateAsync method. This CreateAsync method is provided with the movie object so that it is inserted to the database.
await repository.CreateAsync(movie);Note that the ModelState.IsValid is true only when there are no validation errors. So this means the movie record is created only when all the fields are filled.
Well, that’s all said, let us see how Model Binding and Validation works. So run visual studio and go to the url of the Create razor page – https://localhost:44329/Create . Without filling any of the text boxes, click the Create button to submit the form. You will see validation error messages in red color.

Now fill the values of Name and Actors and then submit the form once again. This time you won’t see any errors on the page and the record will be created on the database.

Now on the SQL Server Object Explorer, right click on the Movie table and select View Data.

You will see the record is inserted on the database.

Congratulations, we successfully inserted the record with Generic Repository Pattern. Next we will see the Reading part.
Now we will build the Read Movie functionality. So, we need to add a new method to our repository which will perform the reading task. So go to the IRepository interface and add ReadAllAsync method as shown below:
public interface IRepository<T> where T : class
{
    Task CreateAsync(T entity);
    Task<List<T>> ReadAllAsync();
}
The ReadAllAsync method returns a list of T types asynchronously. Next, we will have to implement this method on the “Repository.cs” class. The code is shown below in highlighted manner.
using Microsoft.EntityFrameworkCore;
using MovieCrud.Models;

namespace MovieCrud.Entity
{
    public class Repository<T> : IRepository<T> where T : class
    {
        private MovieContext context;

        public Repository(MovieContext context)
        {
            this.context = context;
        }

        public async Task CreateAsync(T entity)
        {
            if (entity == null)
                throw new ArgumentNullException(nameof(entity));

            context.Add(entity);
            await context.SaveChangesAsync();
        }

        public async Task<List<T>> ReadAllAsync()
        {
            return await context.Set<T>().ToListAsync();
        }
    }
}
The method uses Set method to create a Microsoft.EntityFrameworkCore.DbSet object to query the entity from the database. In general term it will read the “T” entity from the database and then we convert it to a list by from the ToListAsync() method.
Moving to the Razor page, create a new Razor Page inside the “Pages” folder and name is Read.cshtml and add the following code to it.
@page
@model ReadModel
@using Microsoft.AspNetCore.Mvc.RazorPages;
@using MovieCrud.Entity;
@using Models;

@{
    ViewData["Title"] = "Movies";
}

<h1 class="bg-info text-white">Movies</h1>
<a asp-page="Create" class="btn btn-secondary">Create a Movie</a>

<table class="table table-sm table-bordered">
    <tr>
        <th>Id</th>
        <th>Name</th>
        <th>Actors</th>
    </tr>
    @foreach (Movie m in Model.movieList)
    {
        <tr>
            <td>@m.Id</td>
            <td>@m.Name</td>
            <td>@m.Actors</td>
        </tr>
    }
</table>

@functions{
    public class ReadModel : PageModel
    {
        private readonly IRepository<Movie> repository;
        public ReadModel(IRepository<Movie> repository)
        {
            this.repository = repository;
        }

        public List<Movie> movieList { get; set; }

        public async Task OnGet()
        {
            movieList = await repository.ReadAllAsync();
        }
    }
}
The code of this Razor Page is quite simple, firstly I have created a link to the “Create” Razor Page with the help of asp-page tag helper.
<a asp-page="Create" class="btn btn-secondary">Create a Movie</a>Next we have an HTML table which contains 3 columns for the 3 fields of the Movie entity. The table will be showing all the Movies which are currently stored in the database. A List<Movie> property is defined on the functions block, it is provided with the list of movie by the OnGet() method.
public List<Movie> movieList { get; set; }

public async Task OnGet()
{
    movieList = await repository.ReadAllAsync();
}
The html table has a foreach loop which structures each record per table row.
@foreach (Movie m in Model.movieList)
{
    <tr>
        <td>@m.Id</td>
        <td>@m.Name</td>
        <td>@m.Actors</td>
    </tr>
}
Since the Read Page is created, so we should redirect user to the Read Page when a new Record is created. So go to Create.cshtml page and change the last line of OnPostAsync hander so that it redirects user to the Read Page. The redirection is done by the RedirectToPage("Read") method. See the change which is shown in highlighted manner.
public async Task<IActionResult> OnPostAsync()
{
    if (ModelState.IsValid)
        await repository.CreateAsync(movie);
    return RedirectToPage("Read");
}
Let us test this page, run visual studio and navigate to https://localhost:44329/Read where you will be shown the Movie Record created earlier (see below image). This shown the Read operation is working perfectly.

We have created the Reading of the records but there is no paging. I created a few more movies which will show together on the page.

This will also cause problem like slowing the page when the number of records increases. To solve this problem, we will create Pagination feature. So, create a new folder called Paging on the root of the app. To this folder add 3 classes which are:
namespace MovieCrud.Paging
{
    public class PagingInfo
    {
        public int TotalItems { get; set; }
        public int ItemsPerPage { get; set; }
        public int CurrentPage { get; set; }
        public int TotalPages
        {
            get
            {
                return (int)Math.Ceiling((decimal)TotalItems /
                    ItemsPerPage);
            }
        }
    }
}
using MovieCrud.Models;

namespace MovieCrud.Paging
{
    public class MovieList
    {
        public IEnumerable<Movie> movie { get; set; }
        public PagingInfo pagingInfo { get; set; }
    }
}
using Microsoft.AspNetCore.Mvc.Rendering;
using Microsoft.AspNetCore.Mvc.Routing;
using Microsoft.AspNetCore.Mvc.ViewFeatures;
using Microsoft.AspNetCore.Mvc;
using Microsoft.AspNetCore.Razor.TagHelpers;
using System.Dynamic;

namespace MovieCrud.Paging
{
    [HtmlTargetElement("div", Attributes = "page-model")]
    public class PageLinkTagHelper : TagHelper
    {
        private IUrlHelperFactory urlHelperFactory;

        public PageLinkTagHelper(IUrlHelperFactory helperFactory)
        {
            urlHelperFactory = helperFactory;
        }

        [ViewContext]
        [HtmlAttributeNotBound]
        public ViewContext ViewContext { get; set; }

        public PagingInfo PageModel { get; set; }

        public string PageName { get; set; }

        /*Accepts all attributes that are page-other-* like page-other-category="@Model.allTotal" page-other-some="@Model.allTotal"*/
        [HtmlAttributeName(DictionaryAttributePrefix = "page-other-")]
        public Dictionary<string, object> PageOtherValues { get; set; } = new Dictionary<string, object>();

        public bool PageClassesEnabled { get; set; } = false;

        public string PageClass { get; set; }

        public string PageClassSelected { get; set; }

        public override void Process(TagHelperContext context, TagHelperOutput output)
        {
            IUrlHelper urlHelper = urlHelperFactory.GetUrlHelper(ViewContext);
            TagBuilder result = new TagBuilder("div");
            string anchorInnerHtml = "";

            for (int i = 1; i <= PageModel.TotalPages; i++)
            {
                TagBuilder tag = new TagBuilder("a");
                anchorInnerHtml = AnchorInnerHtml(i, PageModel);

                if (anchorInnerHtml == "..")
                    tag.Attributes["href"] = "#";
                else if (PageOtherValues.Keys.Count != 0)
                    tag.Attributes["href"] = urlHelper.Page(PageName, AddDictionaryToQueryString(i));
                else
                    tag.Attributes["href"] = urlHelper.Page(PageName, new { id = i });

                if (PageClassesEnabled)
                {
                    tag.AddCssClass(PageClass);
                    tag.AddCssClass(i == PageModel.CurrentPage ? PageClassSelected : "");
                }
                tag.InnerHtml.Append(anchorInnerHtml);
                if (anchorInnerHtml != "")
                    result.InnerHtml.AppendHtml(tag);
            }
            output.Content.AppendHtml(result.InnerHtml);
        }

        public IDictionary<string, object> AddDictionaryToQueryString(int i)
        {
            object routeValues = null;
            var dict = (routeValues != null) ? new RouteValueDictionary(routeValues) : new RouteValueDictionary();
            dict.Add("id", i);
            foreach (string key in PageOtherValues.Keys)
            {
                dict.Add(key, PageOtherValues[key]);
            }

            var expandoObject = new ExpandoObject();
            var expandoDictionary = (IDictionary<string, object>)expandoObject;
            foreach (var keyValuePair in dict)
            {
                expandoDictionary.Add(keyValuePair);
            }

            return expandoDictionary;
        }

        public static string AnchorInnerHtml(int i, PagingInfo pagingInfo)
        {
            string anchorInnerHtml = "";
            if (pagingInfo.TotalPages <= 10)
                anchorInnerHtml = i.ToString();
            else
            {
                if (pagingInfo.CurrentPage <= 5)
                {
                    if ((i <= 8) || (i == pagingInfo.TotalPages))
                        anchorInnerHtml = i.ToString();
                    else if (i == pagingInfo.TotalPages - 1)
                        anchorInnerHtml = "..";
                }
                else if ((pagingInfo.CurrentPage > 5) && (pagingInfo.TotalPages - pagingInfo.CurrentPage >= 5))
                {
                    if ((i == 1) || (i == pagingInfo.TotalPages) || ((pagingInfo.CurrentPage - i >= -3) && (pagingInfo.CurrentPage - i <= 3)))
                        anchorInnerHtml = i.ToString();
                    else if ((i == pagingInfo.CurrentPage - 4) || (i == pagingInfo.CurrentPage + 4))
                        anchorInnerHtml = "..";
                }
                else if (pagingInfo.TotalPages - pagingInfo.CurrentPage < 5)
                {
                    if ((i == 1) || (pagingInfo.TotalPages - i <= 7))
                        anchorInnerHtml = i.ToString();
                    else if (pagingInfo.TotalPages - i == 8)
                        anchorInnerHtml = "..";
                }
            }
            return anchorInnerHtml;
        }
    }
}
The PageLinkTagHelper does the main work of creating paging links. Let me explain how it works.
The tag helpers must inherit TagHelper class and should override the Process function. The process function is the place where we write our tag helper code. Here in our case we will be creating anchor tags for the paging links and show them inside a div.
The tag helper class is applied with HtmlTargetElement attribute which specifies that it will apply to any div which has page-model attribute.
[HtmlTargetElement("div", Attributes = "page-model")]The tag helper class has defined a number of properties which will receive the value from the Razor Page. These properties are PageModel, PageName, PageClassesEnabled, PageClass and PageClassSelected.
There is another property of type ViewContext which is binded with the View Context Data which includes routing data, ViewData, ViewBag, TempData, ModelState, current HTTP request, etc.
[ViewContext]
[HtmlAttributeNotBound]
public ViewContext ViewContext { get; set; }
The use of [HtmlAttributeNotBound] attribute basically says that this attribute isn’t one that you intend to set via a tag helper attribute in the razor page.
The tag helper gets the object of IUrlHelperFactory from the dependency injection feature and uses it to create the paging anchor tags.
IUrlHelper urlHelper = urlHelperFactory.GetUrlHelper(ViewContext);There is also a function called AnchorInnerHtml whose work is to create the text for the paging links. The next thing we have to do is to make this tag helper available to the razor pages, which we can do by adding the below given code line inside the _ViewImports.cshtml file.
@addTagHelper MovieCrud.Paging.*, MovieCrudThe @addTagHelper directive makes Tag Helpers available to the Razor page. The first parameter after @addTagHelper specifies the Tag Helpers to load, I used wildcard syntax (“*”) in the MovieCrud.Paging.* so this means to load all tag helper that have MovieCrud.Paging namespace or any namespace that starts with MovieCrud.Paging like:
MovieCrud.Paging.CustomCode
MovieCrud.Paging.Abc
MovieCrud.Paging.Secret
MovieCrud.Paging.Something
…
And the second parameter “MovieCrud” specifies the assembly containing the Tag Helpers. This is the name of the app.
Next, we need to integrate this tag helper on the Read Razor Page. So first we need to add new method to our repository. Add method called ReadAllFilterAsync to the IRepository. See the highlighted code below:
public interface IRepository<T> where T : class
{
    Task CreateAsync(T entity);
    Task<List<T>> ReadAllAsync();
    Task<(List<T>, int)> ReadAllFilterAsync(int skip, int take);
}
This method returns a Tuple of type List<T> and int. This obviously means it will return a list of records of the current page and total number of records in the database. Other than that, it takes 2 parameters – skip and take, they help us to build the logic to fetch only the records of the current page.
Next add the implementation of this method on the Repository.cs class as shown below.
using Microsoft.EntityFrameworkCore;
using MovieCrud.Models;

namespace MovieCrud.Entity
{
    public class Repository<T> : IRepository<T> where T : class
    {
        private MovieContext context;

        public Repository(MovieContext context)
        {
            this.context = context;
        }

        public async Task CreateAsync(T entity)
        {
            if (entity == null)
                throw new ArgumentNullException(nameof(entity));

            context.Add(entity);
            await context.SaveChangesAsync();
        }

        public async Task<List<T>> ReadAllAsync()
        {
            return await context.Set<T>().ToListAsync();
        }

		public async Task<(List<T>, int)> ReadAllFilterAsync(int skip, int take)
		{
			var all = context.Set<T>();
			var relevant = await all.Skip(skip).Take(take).ToListAsync();
			var total = all.Count();

			(List<T>, int) result = (relevant, total);

			return result;
		}
	}
}
See that now we are fetching only the records of the current page by the use of Linq Skip and Take methods.
var relevant = await all.Skip(skip).Take(take).ToListAsync();Then returning the records along with the count of all the records in a Tuple.
(List<T>, int) result = (relevant, total);Finally, go to Read.cshtml and do the changes which are shown below in highlighted way.
@page "{id:int?}"
@model ReadModel
@using Microsoft.AspNetCore.Mvc.RazorPages;
@using MovieCrud.Entity;
@using Models;
@using Paging;

@{
    ViewData["Title"] = "Movies";
}

<style>
    .pagingDiv {
        background: #f2f2f2;
    }

        .pagingDiv > a {
            display: inline-block;
            padding: 0px 9px;
            margin-right: 4px;
            border-radius: 3px;
            border: solid 1px #c0c0c0;
            background: #e9e9e9;
            box-shadow: inset 0px 1px 0px rgba(255,255,255, .8), 0px 1px 3px rgba(0,0,0, .1);
            font-size: .875em;
            font-weight: bold;
            text-decoration: none;
            color: #717171;
            text-shadow: 0px 1px 0px rgba(255,255,255, 1);
        }

            .pagingDiv > a:hover {
                background: #fefefe;
                background: -webkit-gradient(linear, 0% 0%, 0% 100%, from(#FEFEFE), to(#f0f0f0));
                background: -moz-linear-gradient(0% 0% 270deg,#FEFEFE, #f0f0f0);
            }

            .pagingDiv > a.active {
                border: none;
                background: #616161;
                box-shadow: inset 0px 0px 8px rgba(0,0,0, .5), 0px 1px 0px rgba(255,255,255, .8);
                color: #f0f0f0;
                text-shadow: 0px 0px 3px rgba(0,0,0, .5);
            }
</style>

<h1 class="bg-info text-white">Movies</h1>
<a asp-page="Create" class="btn btn-secondary">Create a Movie</a>

<table class="table table-sm table-bordered">
    <tr>
        <th>Id</th>
        <th>Name</th>
        <th>Actors</th>
    </tr>
    @foreach (Movie m in Model.movieList.movie)
    {
        <tr>
            <td>@m.Id</td>
            <td>@m.Name</td>
            <td>@m.Actors</td>
        </tr>
    }
</table>

<div class="pagingDiv" page-model="Model.movieList.pagingInfo" page-name="Read" page-classes-enabled="true" page-class="paging" page-class-selected="active"></div>

@functions{
    public class ReadModel : PageModel
    {
        private readonly IRepository<Movie> repository;
        public ReadModel(IRepository<Movie> repository)
        {
            this.repository = repository;
        }

        public MovieList movieList { get; set; }

        public async Task OnGet(int id)
        {
            movieList = new MovieList();

            int pageSize = 3;
            PagingInfo pagingInfo = new PagingInfo();
            pagingInfo.CurrentPage = id == 0 ? 1 : id;
            pagingInfo.ItemsPerPage = pageSize;

            var skip = pageSize * (Convert.ToInt32(id) - 1);
            var resultTuple = await repository.ReadAllFilterAsync(skip, pageSize);

            pagingInfo.TotalItems = resultTuple.Item2;
            movieList.movie = resultTuple.Item1;
            movieList.pagingInfo = pagingInfo;
        }
    }
}
Let us understand these changes one by one. From the top id route is added to the page directive.
@page "{id:int?}"This is done because the page number will come in the url as a last segment like:
https://localhost:44329/Read/1
https://localhost:44329/Read/2
https://localhost:44329/Read/3
https://localhost:44329/Read/10
The above type of routing is created ASP.NET Core by default.
The next change is the MovieList property added to the functions block.
public MovieList movieList { get; set; }This property is then used in the foreach loop which is creating the table rows from the records. The Model.movieList.movie will contain the list of movies.
@foreach (Movie m in Model.movieList.movie)After that I added a div containing the page-model attribute and so the tag helper will convert this div to pagination links. Also it’s css is added inside the style block.
<div class="pagingDiv" page-model="Model.movieList.pagingInfo" page-name="Read" page-classes-enabled="true" page-class="paging" page-class-selected="active"></div>The div also has other attributes whose values will be binded to the respective property defined on the tag helper class.
page-model ---- PageModel
page-name ----  PageName
page-classes-enabled --- PageClassesEnabled
page-class --- PageClass
page-class-selected --- PageClassSelected
This type of binding is done by the tag helper automatically. This is how it works:
First remove dash “-“ from the attribute name and then capitalize the first characters from the words before and after the dash sign. Now search this new name among the C# property (given on the tag helper class) and bind the value to this property.
Example : page-mode after removing dash and capitalization of first characters becomes “PageModel”. You have the PageModel property defined on the tag helper class so it binds the value to this property.
In the tag helper class I have PageOtherValues property defined as a dictionary type:
[HtmlAttributeName(DictionaryAttributePrefix = "page-other-")]
public Dictionary<string, object> PageOtherValues { get; set; } = new Dictionary<string, object>();
This property gets the values in Dictionary type from the attributes that starts with “page-other-”. Examples of such attributes can be:
page-other-other
page-other-data
page-other-name
The values of these attributes will be added to the query string of url. The function AddDictionaryToQueryString defined on the class does this work.
Although I have not used it but it can be useful if you want to add more features to your tag helper class.
Now moving to the OnGet Handler which now gets the page number value in it’s parameter. Recall we have added it to the page directive some time back.
I have set the page size as 3 which you can change according to your wish.
int pageSize = 3;The current page and the items per page are added to the PagingInfo class object. Also the value of the starting record for the page is calculated and added to the skip variable.
var skip = pageSize * (Convert.ToInt32(id) - 1);Next, we call the ReadAllFilterAsync method with the value of skip and the number of records to fetch (i.e. pagesize).
var resultTuple = await repository.ReadAllFilterAsync(skip, pageSize);The method returns Tuple whose value is extracted and provided to the TotalItems of pagingInfo and movie of movieList.
pagingInfo.TotalItems = resultTuple.Item2;
movieList.movie = resultTuple.Item1;
Finally we provide pagingInfo property of the movieList object the value of pagingInfo.
movieList.pagingInfo = pagingInfo;As you can see the movieList’s pagingInfo value is provided to the page-model attribute of tag helper while the movieList’s movie value is used in the foreach loop.
One more change is needed now on the Create.cshtml Razor Page. This change is on the OnPostAsync hander, see highlighted code below:
public async Task<IActionResult> OnPostAsync()
 {
     if (ModelState.IsValid)
     {
         await repository.CreateAsync(movie);
         return RedirectToPage("Read", new { id = 1 });
     }
     else
         return Page();
 }
We are now redirecting to the first page of the Read razor page in case the new record is successfully created. The redirected url will be https://localhost:44329/Read/1.
return RedirectToPage("Read", new { id = 1 });For the case when there happens to be validation errors, we simply return to the same page.
return Page();Now run visual studio, create a few movie records, and navigate to the url – https://localhost:44329/Read/1 where you will see the pagination links working excellently.

For large number of pages the pagination will add two dots “..” before and after the last and first page’s links (check the below image). This is just like what we see in professional sites.

We just completed the Read Record CRUD operation in Razor Pages. Next we will create the Update operation.
Now moving to the Update Movie feature, like what we did previously, add a new method called UpdateAsync to the IRepository interface:
public interface IRepository<T> where T : class
{
    Task CreateAsync(T entity);
    Task<List<T>> ReadAllAsync();
    Task<(List<T>, int)> ReadAllFilterAsync(int skip, int take);
    Task UpdateAsync(T entity);
}
Also implement this method on the Repository.cs class.
public async Task UpdateAsync(T entity)
{
    if (entity == null)
        throw new ArgumentNullException(nameof(entity));

    context.Update(entity);
    await context.SaveChangesAsync();
}
The UpdateAsync method is updating the entity in the database from the last 2 lines:
context.Update(entity);
await context.SaveChangesAsync();
After this, we need to create a new Razor Page called Update.cshtml to the “Pages” folder. Next, add the following code to it:
@page
@model UpdateModel
@using Microsoft.AspNetCore.Mvc.RazorPages;
@using MovieCrud.Entity;
@using Models;

@{
    ViewData["Title"] = "Update a Movie";
}

<h1 class="bg-info text-white">Update a Movie</h1>
<a asp-page="Read" class="btn btn-secondary">View all Movies</a>

<div asp-validation-summary="All" class="text-danger"></div>

<form method="post">
    <div class="form-group">
        <label asp-for="movie.Id"></label>
        <input type="text" asp-for="movie.Id" readonly class="form-control" />
    </div>
    <div class="form-group">
        <label asp-for="movie.Name"></label>
        <input type="text" asp-for="movie.Name" class="form-control" />
        <span asp-validation-for="movie.Name" class="text-danger"></span>
    </div>
    <div class="form-group">
        <label asp-for="movie.Actors"></label>
        <input type="text" asp-for="movie.Actors" class="form-control" />
        <span asp-validation-for="movie.Actors" class="text-danger"></span>
    </div>
    <button type="submit" class="btn btn-primary">Update</button>
</form>

@functions{
    public class UpdateModel : PageModel
    {
        private readonly IRepository<Movie> repository;
        public UpdateModel(IRepository<Movie> repository)
        {
            this.repository = repository;
        }

        [BindProperty]
        public Movie movie { get; set; }

        public async Task<IActionResult> OnGet(int id)
        {
            movie = await repository.ReadAsync(id);
            return Page();
        }

        public async Task<IActionResult> OnPostAsync()
        {
            if (ModelState.IsValid)
            {
                await repository.UpdateAsync(movie);

                return RedirectToPage("Read", new { id = 1 });
            }
            else
                return Page();
        }
    }
}
The code of the Update Razor Page is very similar to the Create Razor Page, just a few changes which are:
1. In the OnGet() handler the repository is called to fetch the record whose id the handler receives in it’s parameter.
movie = await repository.ReadAsync(id);The record’s id will be sent to the Update Razor Pages as a query string parameter. I have shown such links below:
https://localhost:44329/Update?id=1
https://localhost:44329/Update?id=2
https://localhost:44329/Update?id=10
…
The OnGet hander has (int id) in it’s parameter and the model binding feature will automatically bind this id parameter with the value of the id given on the query string.
public async Task<IActionResult> OnGet(int id) {...}I am calling the ReadAsync() method of the repository and passing the value of the record id to be fetched to it. This means we will have to add this method to our Generic Repository. So add this method to the IRepository interface.
public interface IRepository<T> where T : class
{
    Task CreateAsync(T entity);
    Task<List<T>> ReadAllAsync();
    Task<(List<T>, int)> ReadAllFilterAsync(int skip, int take);
    Task UpdateAsync(T entity);
    Task<T> ReadAsync(int id);
}
Also implement it on the IRepository.cs class. As shown below.
public async Task<T> ReadAsync(int id)
{
    return await context.Set<T>().FindAsync(id);
}
The above method used the FindAsync() method of Entity Framework Core and passes the id of the entity which needs to be read from the database.
2. On the OnPostAsync() handler we check if model state is valid and then call the UpdateAsync method of the repository with the entity to be updated. Next redirecting the user to the first page of the Read.cshtml.
if (ModelState.IsValid)
{
    await repository.UpdateAsync(movie);
    return RedirectToPage("Read", new { id = 1 });
}
Another thing we need to do is to link the Update page from the Read page. The table on the Read.cshml which shows the movie records is an ideal area for this. We will add another column for the table, an anchor tag will be added to this column, this anchor tag will be linking to the Update page. See the changes I have highlighted on the table.
<table class="table table-sm table-bordered">
    <tr>
        <th>Id</th>
        <th>Name</th>
        <th>Actors</th>
        <th></th>
    </tr>
    @foreach (Movie m in Model.movieList.movie)
    {
        <tr>
            <td>@m.Id</td>
            <td>@m.Name</td>
            <td>@m.Actors</td>
            <td>
                <a class="btn btn-sm btn-primary" asp-page="Update" asp-route-id="@m.Id">
                    Update
                </a>
            </td>
        </tr>
    }
</table>
The anchor tag’s href value will be created by asp-page and asp-route tag helpers. The asp-page is provided with the name of the page which is Update, while asp-route is provided with the name of the route which is id. The id value is added to the tag helper from the foreach loop mechanism.
<a class="btn btn-sm btn-primary" asp-page="Update" asp-route-id="@m.Id">Update</a>Run the app on visual studio and go to the Read Page’s URL https://localhost:44329/Read/1. Here you will see blue Update link (looking like a button) against each record on the table. Click the Update link for the 2nd record.
You will be taken to the Update Razor page whose url will be https://localhost:44329/Update?id=2. Here you can update the 2nd record. I have shown this whole thing in the below image.

Notice the id of the record which is 2 is send in the URL as a query string:
https://localhost:44329/Update?id=2Similarly, if you click on the 10th record then the URL will obviously become:
https://localhost:44329/Update?id=10This completes the Update Record CRUD operations. We are now left with only the Delete operation so kindly proceed with it quickly.
Start by adding method called DeleteAsync to the interface. This method accepts id of the entity as a parameter.
Task DeleteAsync(int id);Also implement this method on the IRepository.cs class.
public async Task DeleteAsync(int id)
{
    var entity = await context.Set<T>().FindAsync(id);
    if (entity == null)
        throw new ArgumentNullException(nameof(entity));

    context.Set<T>().Remove(entity);
    await context.SaveChangesAsync();
}
In this method we used FindAsync method of the repository to find the entity by it’s id.
var entity = await context.Set<T>().FindAsync(id);And then deleted the entity by Entity Framework Core Remove method.
context.Set<T>().Remove(entity);
await context.SaveChangesAsync();
Next, moving to the razor page. We do not need to create a new Razor Page for the Delete operation in-fact we will use the Read.cshtml page for this. To create the Delete CRUD operation, we will add another column to the table on the Read.cshmtl Razor Page. This column will contain a delete button which on clicking will delete the record.
The change to make to the table is shown below:
<table class="table table-sm table-bordered">
    <tr>
        <th>Id</th>
        <th>Name</th>
        <th>Actors</th>
        <th></th>
        <th></th>
    </tr>
    @foreach (Movie m in Model.movieList.movie)
    {
        <tr>
            <td>@m.Id</td>
            <td>@m.Name</td>
            <td>@m.Actors</td>
            <td>
                <a class="btn btn-sm btn-primary" asp-page="Update" asp-route-id="@m.Id">
                    Update
                </a>
            </td>
            <td>
                <form asp-page-handler="Delete" asp-route-id="@m.Id" method="post">
                    <button type="submit" class="btn btn-sm btn-danger">
                        Delete
                    </button>
                </form>
            </td>
        </tr>
    }
</table>
Notice we created a form and a button inside it. This button will post the form when clicked.
<form asp-page-handler="Delete" asp-route-id="@m.Id" method="post">
    <button type="submit" class="btn btn-sm btn-danger">
        Delete
    </button>
</form>
The form has 2 tag helpers which are:
Note that hander can be both synchronous and asynchronous. Asynchronous handers have the term “Async” at the end of their name. The name of the method is appended to “OnPost” or “OnGet”, depending on whether the handler should be called as a result of a POST or GET request. So, I added asp-page-handler="delete" and not asp-page-handler="OnPostDelete".
Finally we will have to add OnPostDeleteAsync hander to the Read.cshtml file. This handler be called on the click of the delete button.
public async Task<IActionResult> OnPostDeleteAsync(int id)
{
    await repository.DeleteAsync(id);
    return RedirectToPage("Read", new { id = 1 });
}
The OnPostDeleteAsync hander is an asynchronous hander as it has “Async” on it’s end. The term OnPost at the beginning of it’s name specify that it is Post type hander.
This method calls the DeleteAsync() method of the repository and sends the id of the entity to it’s parameter.
repository.DeleteAsync(id);After the record is deleted the user is redirected to the first page of the “Read.cshml”.
return RedirectToPage("Read", new { id = 1 });Run the app on Visual Studio, on the Read Page you will see Delete button on each row of the table. Click on any button to delete the entity from the database. Check the below image.

I would like to explain you how the handers work. If you inspect the html of the form, you will see the form’s action contains the hander query string with value as the name of the hander – /Read/14?handler=delete. See the below image.

Since the form method is defined as post i.e. method="post" and we have our hander defined as Post one i.e. OnPost at the beginning on it’s name. Therefore when the form is submitted we are sure the correct hander will be called and the deletion of the entity will be done successfully.
We can also use this concept to call a Get type hander on a Razor Page by targeting it with an anchor tag.
Suppose we have a handler called OnGetSomething on a Razor Page called Job.cshtml
public async Task<IActionResult> OnGetSomething()
{
    …
}
We can call this hander by an anchor tag on some other page as:
<a href="/Job?handler=something">Job</a>Congratulations you for building CRUD Operations using Razor Pages and Generic Repository Pattern & Entity Framework Core. You now have enough confidence to create and build any type of Database operations in Razor Pages using a cleaner code by Generic Repository Patter. Here is a bonus topic to you.
Let us create a feature to search an entity by it’s name using LINQ Expression. So, to the interface and it’s implementation class, import the below given namespace.
using System.Linq.Expressions; Next, add a new method called ReadAllAsync to the IRepository interface. This method will have Expression<Func<T, bool>> type parameter which can be used to send filter expression.
Task<List<T>> ReadAllAsync(Expression<Func<T, bool>> filter);Next, to the Repository.cs add this method:
public async Task<List<T>> ReadAllAsync(Expression<Func<T, bool>> filter)
{
    return await context.Set<T>().Where(filter).ToListAsync();
}
The Func<T, bool> means the filter express will be on “T” type entity and returns bool type. So we can apply this filter express on the “Where” clause as shown below.
context.Set<T>().Where(filter)Now we create a new Razor Page inside the “Pages” folder. Name this page as Search.cshtml and add the following code to it:
@page
@model SearchModel
@using Microsoft.AspNetCore.Mvc.RazorPages;
@using MovieCrud.Entity;
@using System.Linq.Expressions;
@using Models;

@{
    ViewData["Title"] = "Search Movies";
}

<h1 class="bg-info text-white">Movies</h1>
<a asp-page="/Read" asp-route-id="1" class="btn btn-secondary">View all Movies</a>

<form method="post">
    <div class="form-group">
        <label asp-for="@Model.movie.Name"></label>
        <input type="text" asp-for="@Model.movie.Name" class="form-control" />
    </div>
    <button type="submit" class="btn btn-primary">Search</button>
</form>


@if (Model.movieList != null)
{
    <h2 class="bg-danger text-white m-2">Result</h2>
    <table class="table table-sm table-bordered">
        <tr>
            <th>Id</th>
            <th>Name</th>
            <th>Actors</th>
        </tr>
        @foreach (Movie m in Model.movieList)
        {
            <tr>
                <td>@m.Id</td>
                <td>@m.Name</td>
                <td>@m.Actors</td>
            </tr>
        }
    </table>
}

@functions{
    public class SearchModel : PageModel
    {
        private readonly IRepository<Movie> repository;
        public SearchModel(IRepository<Movie> repository)
        {
            this.repository = repository;
        }

        [BindProperty]
        public Movie movie { get; set; }

        public List<Movie> movieList { get; set; }

        public void OnGet()
        {
        }

        public async Task<IActionResult> OnPostAsync()
        {
            Expression<Func<Movie, bool>> filter = m => m.Name == movie.Name;
            movieList = await repository.ReadAllAsync(filter);
            return Page();
        }
    }
}
Points to note:
The page has an input tag to enter the name for the entitiy to be searched.
<input type="text" asp-for="@Model.movie.Name" class="form-control" />The value of the input tag is bind to the Movie property.
[BindProperty]
public Movie movie { get; set; }
Inside the OnPostAsync we create the filter expression to match the name as that entered on the input tag.
Expression<Func<Movie, bool>> filter = m => m.Name == movie.Name;Next we pass the expression to the ReadAllAsync method of the repository.
movieList = await repository.ReadAllAsync(filter);So if we entered “Rear Window” in the text box then the repository method will create the where express as shown below.
context.Set<T>().Where(= m => m.Name == "Rear Window").ToListAsync()Finally run the app and go to the search page and perform the search, url – https://localhost:44329/Search. The search layout and result is shown in the below image.

In this long tutorial on Repository Pattern we successfully implemented in on ASP.NET Core Razor Pages app. Enjoy and happy coding.
SHARE THIS ARTICLE

Hello Everyone,
 Welcome to Hosting.Work - A Programming Tutorial Website. It covers ASP.NET Core topics. I hope you enjoy reading it.
Enter your email address to subscribe to this blog and receive notifications of new posts by email
Subscribe to our Newsletter and recevie "1 email per week" for the article published on the site. No spamming...


I really Love your articles. Specifically I like “ASP.NET Core Razor Pages : CRUD Operations with Repository Pattern and Entity Framework Core” Do you by chance have an equivalent one for MVC/Razor?
I am trying to learn .net core mvc using razor and these really help!
Thank you Andy, I don’t have MVC post on Repository Pattern but you can check my other site YogiHosting which contains 80+ articles on ASP.NET Core MVC.